Difference between revisions of "RPI-CONSOLE"
Jump to navigation
Jump to search
Blwikiadmin (talk | contribs) |
Blwikiadmin (talk | contribs) |
||
| (41 intermediate revisions by the same user not shown) | |||
| Line 1: | Line 1: | ||
[[File:tindie-mediums.png|link=https://www.tindie.com/products/land_boards/raspberry-pi-console-card-rpi-console/]] | [[File:tindie-mediums.png|link=https://www.tindie.com/products/land_boards/raspberry-pi-console-card-rpi-console/]] | ||
| − | + | [[File:RP-Console-CCA-X1-4955-Ext40-640px.jpg]] | |
<video type="youtube">7CgPtWzIAok</video> | <video type="youtube">7CgPtWzIAok</video> | ||
| − | + | == Raspberry PI Console Card - Features == | |
| − | |||
| − | |||
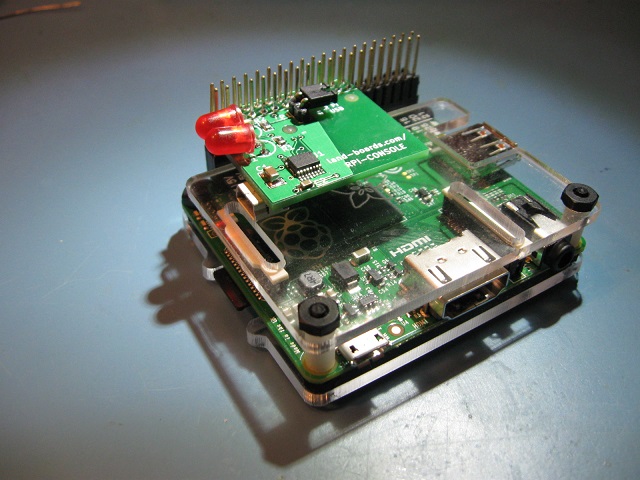
* Console port lets you talk to your Raspberry Pi over USB without a keyboard/mouse/monitor or Ethernet connection. | * Console port lets you talk to your Raspberry Pi over USB without a keyboard/mouse/monitor or Ethernet connection. | ||
| − | * 115200 baud | + | ** 115200 baud |
| − | * Real FTDI chip ([https://www.ftdichip.com/Support/Documents/DataSheets/ICs/DS_FT230X.pdf FT230XS]) | + | ** Real FTDI chip ([https://www.ftdichip.com/Support/Documents/DataSheets/ICs/DS_FT230X.pdf FT230XS]) |
| + | * Raspberry Pins | ||
| + | ** Pin 8 is TxD (out from Pi) | ||
| + | ** Pin 10 us RxD (in to Pi) | ||
* USB Mini-B connector | * USB Mini-B connector | ||
** Mounted on the bottom of the card (See also our Micro USB version) | ** Mounted on the bottom of the card (See also our Micro USB version) | ||
| Line 22: | Line 23: | ||
** 26-pin non-extender connector works with all Model Pis | ** 26-pin non-extender connector works with all Model Pis | ||
| − | + | == Driver == | |
| − | + | ||
| − | + | * Finding your COM port can be a hassle in Windows. Here's how we find the port in Window 8.1 | |
| − | + | ** Run Device Manager | |
| + | ** Expand the Ports (COM & LPT) | ||
| + | **USB Serial Port is the RPI-Console card (COM5 in this instance, your mileage may vary) | ||
| + | |||
| + | [[File:RPI-CONSOLE-DeviceManager-04.PNG]] | ||
| + | |||
| + | Right click on the COM line at Properties to show that the part is an FTDI part and the driver is working properly | ||
| + | |||
| + | [[File:RPI-CONSOLE-DeviceManager-01.PNG]] | ||
| + | Set the baud rate to 115,200 baud, 8 data bits, 1 stop bit | ||
| − | + | [[File:RPI-CONSOLE-DeviceManager-02.PNG]] | |
| − | RPI-CONSOLE- | ||
| − | + | Here are the driver details | |
| − | + | [[File:RPI-CONSOLE-DeviceManager-03.PNG]] | |
| − | |||
| − | |||
| − | |||
| − | |||
| − | + | Prototype Qualification Tests | |
| − | + | Tested on a Raspberry Pi Model A+ | |
| − | + | Able to power the Raspberry Pi Model A+ | |
| − | + | Able to monitor the boot sequence of a Raspberry Pi Model A+ | |
| − | |||
| − | |||
| − | |||
| − | |||
| − | |||
| − | |||
| − | |||
| − | |||
| − | |||
| − | |||
| − | + | == Factory Acceptance Tests == | |
| − | |||
| − | + | Procedure to test RPI-Console card | |
| − | |||
| − | |||
| − | |||
| − | |||
| − | RPI-Console | ||
| − | Wire V5-1 header pin S (pin 3) to GVSDuino pin | + | === GVSDuino wired to custom board === |
| − | Wire V5-2 header pin S (pin 3) to GVSDuino pin | + | |
| − | Wire V5-1 header pin GND (pin 1) to | + | [[File:RPI-Console-Test-5459-cropped-640px.jpg]] |
| − | Wire V5-1 header pin +5V (pin 2) to | + | |
| − | Test Software | + | * Custom [[RASPI-PLUS-GVS-CFG]] Test card to [[GVSDuino]] card wiring |
| − | Poll for receive character | + | ** Wire V5-1 header pin S (pin 3) to GVSDuino GVS pin D3 SIG (TX) |
| − | When character is received, echo back character | + | ** Wire V5-2 header pin S (pin 3) to GVSDuino GVS pin D2 SIG (RX) |
| − | Loop forever | + | ** Wire V5-1 header pin GND (pin 1) to GVSDuino GVS pin D2 GND |
| − | Code on GitHub | + | ** Wire V5-2 header pin GND (pin 1) to GVSDuino GVS pin D3 GND |
| − | Test Procedure | + | ** Wire V5-1 header pin +5V (pin 2) to GVSDuino GVS pin D2 +5V power |
| − | Test setup as above | + | ** Wire V5-2 header pin +5V (pin 2) to GVSDuino GVS pin D3 +5V power |
| − | Test setup powered down | + | * [[GVS-Switch]] to [[GVSDuino]] wiring |
| − | Install UUT (RPI-Console card being tested) | + | **[[GVS-Switch]] Pin 1 (GND) to [[GVSDuino]] J3 pin 6 |
| − | + | ** [[GVS-Switch]] Pin 2 (VCC) to [[GVSDuino]] J3 pin 2 | |
| − | + | ** [[GVS-Switch]] Pin 3 (RESET*) to [[GVSDuino]] J3 pin 7 | |
| − | Connect USB cable from Test Computer | + | |
| − | Boards should power up | + | === Test Software === |
| − | + | ||
| − | Look in Device manager to make sure COM port was added | + | * Push button to reset on [[GVSDuino]] to send out canned message |
| − | Select COM port in putty | + | * Poll for receive character |
| − | Hit reset on | + | ** When character is received, echo back character |
| − | Verify the message comes back | + | * Loop forever |
| + | * [https://github.com/land-boards/lb-Arduino-Code/tree/master/LBCards/RPI-Console/RPI-LOOP2 Code on GitHub] | ||
| + | |||
| + | === Test Procedure === | ||
| + | |||
| + | * Test setup as above | ||
| + | * Test setup powered down | ||
| + | * Install UUT (RPI-Console card being tested) | ||
| + | * Connect USB Mini cable from Test Computer to UUT | ||
| + | * Boards should power up | ||
| + | * Look in Device manager to make sure COM port was added | ||
| + | * Run putty on Test Computer | ||
| + | ** Select COM port in putty | ||
| + | ** 9600, n, 8, 1 | ||
| + | ** No handshake | ||
| + | * Hit reset on [[GVS-Switch]] card on 830 point breadboard | ||
| + | * Verify the message comes back | ||
| + | <pre> | ||
The quick brown fox jumped over the lazy dog | The quick brown fox jumped over the lazy dog | ||
0123456789 | 0123456789 | ||
asdfghjkl | asdfghjkl | ||
Hit keys to test | Hit keys to test | ||
| − | Type and verify that the character comes back | + | </pre> |
| − | Disconnect USB to RPI-Console | + | * Type and verify that the character comes back |
| − | Delete Extra Ports on a Windows machine | + | * Disconnect USB to RPI-Console |
| − | Windows assigns new ports and keeps old ports. | + | |
| − | We tested over a hundred cards and ended up with a lot of unused serial ports. | + | === Custom wired RASPI-PLUS-GVS-CFG bare board === |
| − | If you have a lot of serial ports that you no longer use, you can return them to the pool for future use. | + | |
| − | From this webpage. | + | [[File:RPI-CONSOLE-TEST-BOARD-640PX.jpg]] |
| + | |||
| + | * Card is connected to act as a Raspberry Pi emulator | ||
| + | ** Install 20x2 male header going up on board to board connector at top of the board | ||
| + | ** Install the TXS0108EWPR 3.3V<>5V Voltage Translator at U2 | ||
| + | ** Install F1 (5V fuse) | ||
| + | ** Install 3.3V regulator at C2 position | ||
| + | |||
| + | [[File:VREG pkg.PNG]] | ||
| + | |||
| + | [[File:RPI-CONSOLE-VREG-WIRING.jpg]] | ||
| + | |||
| + | * Wire the Vreg | ||
| + | ** VReg pin 1 goes to ground side of C2 | ||
| + | ** VReg pin 2 goes to +3.3V side of C2 | ||
| + | ** Jumper tab to VReg pin 2 | ||
| + | ** Wire VReg pin 3 to V5-8 pin 2 (+5V) | ||
| + | * Add 47 uF cap from IO16-2 (+5V) and IO16-1 (GND) | ||
| + | * Install 330 Ohm resistor at R4 | ||
| + | * Install 3mm LED at W jumper (J22-1 to J22-2) position (Cathode of LED to pin 1 of J22) | ||
| + | * Add wire from UART connector pin 3 to V3-1 pin (TXD on CFG card) (Serial out from Pi) | ||
| + | * Add wire from UART connector pin 4 to V3-2 pin (RXD on CFG card) (Serial in to Pi) | ||
| + | * Install 2x3 header at V5-1/V5-2 position | ||
| + | ** V5-1 (pin 1 = GND, pin 2 = +5V, pin 3 = TxD - Serial out from the Arduino) | ||
| + | ** V5-2 (pin 1 = GND, pin 2 = +5V, pin 3 = RxD - Serial in to the Arduino) | ||
| + | |||
| + | == Delete Extra Ports on a Windows machine == | ||
| + | |||
| + | * Windows assigns new ports and keeps old ports. | ||
| + | * We tested over a hundred cards and ended up with a lot of unused serial ports. | ||
| + | * If you have a lot of serial ports that you no longer use, you can return them to the pool for future use. | ||
| + | |||
| + | From [http://www.fettesps.com/how-to-remove-com-ports-which-are-in-use/ this webpage]. | ||
| − | Open the Command Prompt as administrator and start the Device Manager from the same command prompt. | + | [[file:CommandPrompt_AsAdmin.png]] |
| + | |||
| + | * Open the Command Prompt as administrator and start the Device Manager from the same command prompt. | ||
| + | # Right-click “Command Prompt” in Accessories and choose “Run as Administrator” | ||
| + | # Enter “set devmgr_show_nonpresent_devices=1″ – without the quotes obviously | ||
| + | # Enter “start devmgmt.msc” | ||
| + | |||
| + | [[file:Cmd_Stuff.PNG]] | ||
| + | |||
| + | # In the box that opens, select “Show hidden devices” in the ‘view’ menu. | ||
| + | |||
| + | [[file:ShowHiddenDevs.png]] | ||
| − | |||
| − | |||
| − | |||
| − | |||
Now if you expand the section on COM ports, all the COM ports that have ever been created will be displayed, the non present ones being in grey. You can uninstall away anything that you don’t want (right click, select uninstall). | Now if you expand the section on COM ports, all the COM ports that have ever been created will be displayed, the non present ones being in grey. You can uninstall away anything that you don’t want (right click, select uninstall). | ||
| − | Specs | + | == Specs == |
| − | 26-pin stacking connector | + | |
| − | 40-pin stacking connector | + | * [http://www.adafruit.com/product/1112 26-pin stacking connector] |
| − | External links | + | * [https://www.adafruit.com/products/2223 40-pin stacking connector] |
| − | Adafruit tutorial | + | |
| − | NOOBS without a display | + | == External links == |
| − | How COM Ports Are Allocated On Driver Installation | + | |
| − | Troubleshooting | + | * [https://learn.adafruit.com/adafruits-raspberry-pi-lesson-5-using-a-console-cable/test-and-configure Adafruit tutorial |
| − | + | * [https://github.com/raspberrypi/noobs/tree/dev#how-to-automatically-install-an-os NOOBS without a display] | |
| + | * [http://www.ftdichip.com/Support/Documents/AppNotes/AN_123_How%20COM%20Ports_Are%20Allocated%20on%20Driver_Installation.pdf How COM Ports Are Allocated On Driver Installation] | ||
| + | |||
| + | == Troubleshooting == | ||
| + | Raspberry Pi 3 problem [http://www.briandorey.com/post/Raspberry-Pi-3-UART-Boot-Overlay-Part-Two described below (with solution)]: | ||
| + | <pre> | ||
With the release of the Raspberry Pi 3 the original hardware UART from the Broadcom processor | With the release of the Raspberry Pi 3 the original hardware UART from the Broadcom processor | ||
has been reassigned to the Bluetooth chipset and the UART output on the GPIO pins now uses a mini-uart port. | has been reassigned to the Bluetooth chipset and the UART output on the GPIO pins now uses a mini-uart port. | ||
The mini-uart doesn't have a separate clock divisor and uses the core clock frequency. | The mini-uart doesn't have a separate clock divisor and uses the core clock frequency. | ||
| + | </pre> | ||
== Assembly Sheet == | == Assembly Sheet == | ||
* [[RPI-CONSOLE Assembly Sheet]] | * [[RPI-CONSOLE Assembly Sheet]] | ||
Latest revision as of 16:03, 31 March 2022
Contents
Raspberry PI Console Card - Features
- Console port lets you talk to your Raspberry Pi over USB without a keyboard/mouse/monitor or Ethernet connection.
- 115200 baud
- Real FTDI chip (FT230XS)
- Raspberry Pins
- Pin 8 is TxD (out from Pi)
- Pin 10 us RxD (in to Pi)
- USB Mini-B connector
- Mounted on the bottom of the card (See also our Micro USB version)
- Jumper selectable - power the Pi from your computer's USB port
- Newer Pi cards may take too much power
- Transmit/receive LEDs
- (3) Pi Connector options - extender allows daughtercards to be added on top
- 26-pin extender connector works with Model A and Model B Pis
- 40-pin extender connector works with Model A+, Model B+ Pis and the new Pi 2
- 26-pin non-extender connector works with all Model Pis
Driver
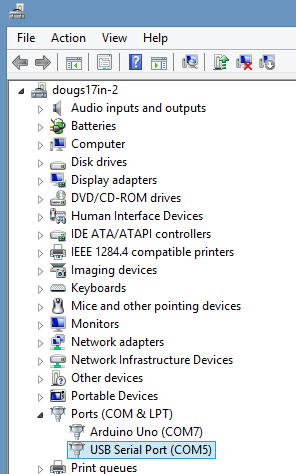
- Finding your COM port can be a hassle in Windows. Here's how we find the port in Window 8.1
- Run Device Manager
- Expand the Ports (COM & LPT)
- USB Serial Port is the RPI-Console card (COM5 in this instance, your mileage may vary)
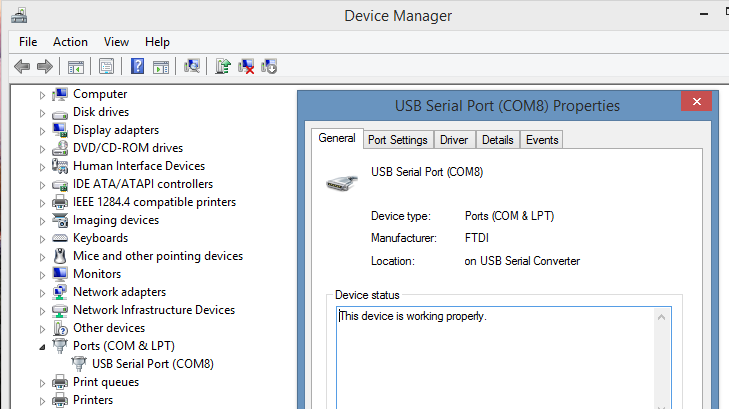
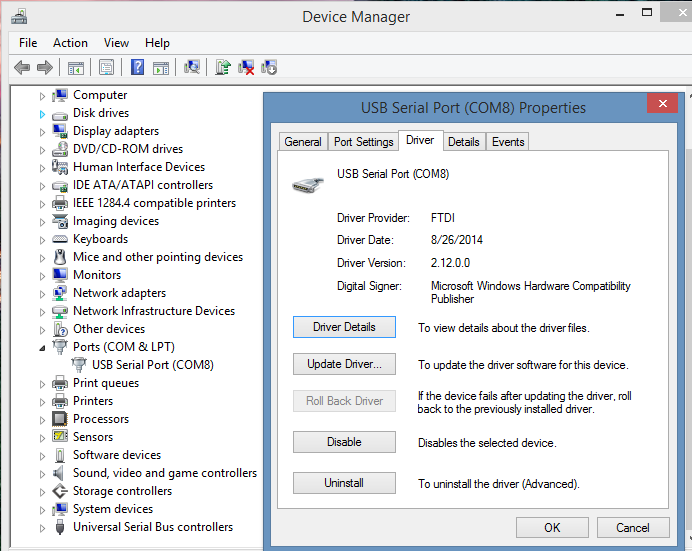
Right click on the COM line at Properties to show that the part is an FTDI part and the driver is working properly
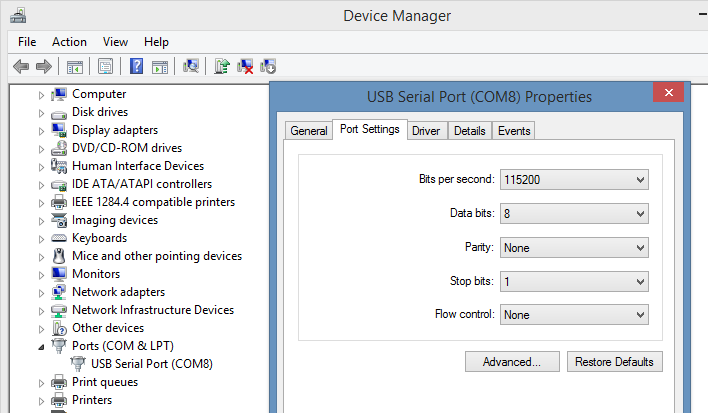
Set the baud rate to 115,200 baud, 8 data bits, 1 stop bit
Here are the driver details
Prototype Qualification Tests Tested on a Raspberry Pi Model A+ Able to power the Raspberry Pi Model A+ Able to monitor the boot sequence of a Raspberry Pi Model A+
Factory Acceptance Tests
Procedure to test RPI-Console card
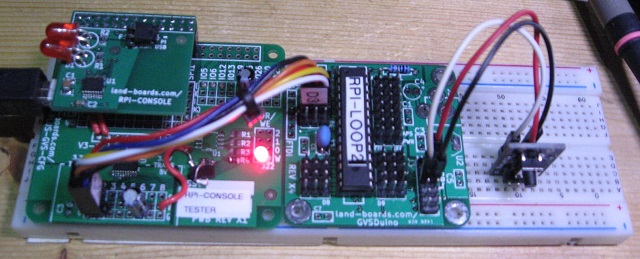
GVSDuino wired to custom board
- Custom RASPI-PLUS-GVS-CFG Test card to GVSDuino card wiring
- Wire V5-1 header pin S (pin 3) to GVSDuino GVS pin D3 SIG (TX)
- Wire V5-2 header pin S (pin 3) to GVSDuino GVS pin D2 SIG (RX)
- Wire V5-1 header pin GND (pin 1) to GVSDuino GVS pin D2 GND
- Wire V5-2 header pin GND (pin 1) to GVSDuino GVS pin D3 GND
- Wire V5-1 header pin +5V (pin 2) to GVSDuino GVS pin D2 +5V power
- Wire V5-2 header pin +5V (pin 2) to GVSDuino GVS pin D3 +5V power
- GVS-Switch to GVSDuino wiring
- GVS-Switch Pin 1 (GND) to GVSDuino J3 pin 6
- GVS-Switch Pin 2 (VCC) to GVSDuino J3 pin 2
- GVS-Switch Pin 3 (RESET*) to GVSDuino J3 pin 7
Test Software
- Push button to reset on GVSDuino to send out canned message
- Poll for receive character
- When character is received, echo back character
- Loop forever
- Code on GitHub
Test Procedure
- Test setup as above
- Test setup powered down
- Install UUT (RPI-Console card being tested)
- Connect USB Mini cable from Test Computer to UUT
- Boards should power up
- Look in Device manager to make sure COM port was added
- Run putty on Test Computer
- Select COM port in putty
- 9600, n, 8, 1
- No handshake
- Hit reset on GVS-Switch card on 830 point breadboard
- Verify the message comes back
The quick brown fox jumped over the lazy dog
0123456789
asdfghjkl
Hit keys to test
- Type and verify that the character comes back
- Disconnect USB to RPI-Console
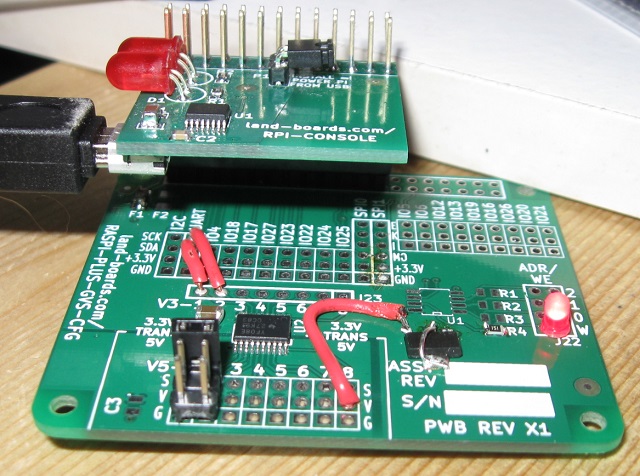
Custom wired RASPI-PLUS-GVS-CFG bare board
- Card is connected to act as a Raspberry Pi emulator
- Install 20x2 male header going up on board to board connector at top of the board
- Install the TXS0108EWPR 3.3V<>5V Voltage Translator at U2
- Install F1 (5V fuse)
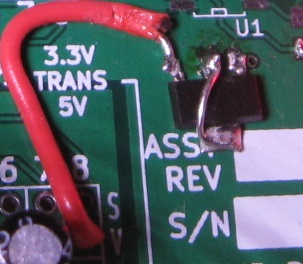
- Install 3.3V regulator at C2 position
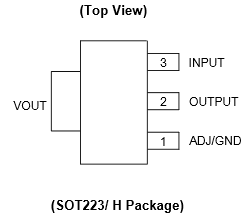
- Wire the Vreg
- VReg pin 1 goes to ground side of C2
- VReg pin 2 goes to +3.3V side of C2
- Jumper tab to VReg pin 2
- Wire VReg pin 3 to V5-8 pin 2 (+5V)
- Add 47 uF cap from IO16-2 (+5V) and IO16-1 (GND)
- Install 330 Ohm resistor at R4
- Install 3mm LED at W jumper (J22-1 to J22-2) position (Cathode of LED to pin 1 of J22)
- Add wire from UART connector pin 3 to V3-1 pin (TXD on CFG card) (Serial out from Pi)
- Add wire from UART connector pin 4 to V3-2 pin (RXD on CFG card) (Serial in to Pi)
- Install 2x3 header at V5-1/V5-2 position
- V5-1 (pin 1 = GND, pin 2 = +5V, pin 3 = TxD - Serial out from the Arduino)
- V5-2 (pin 1 = GND, pin 2 = +5V, pin 3 = RxD - Serial in to the Arduino)
Delete Extra Ports on a Windows machine
- Windows assigns new ports and keeps old ports.
- We tested over a hundred cards and ended up with a lot of unused serial ports.
- If you have a lot of serial ports that you no longer use, you can return them to the pool for future use.
From this webpage.
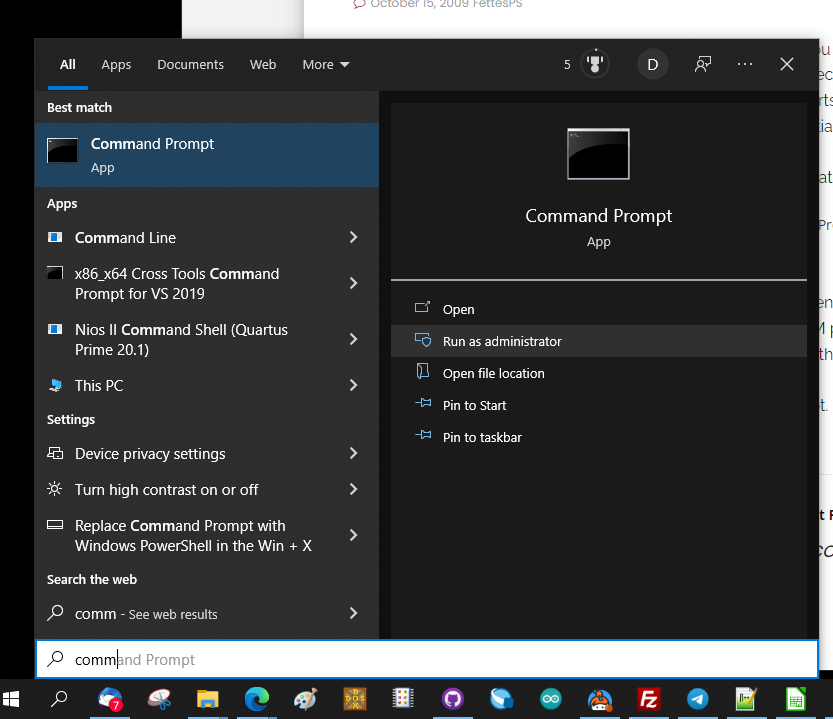
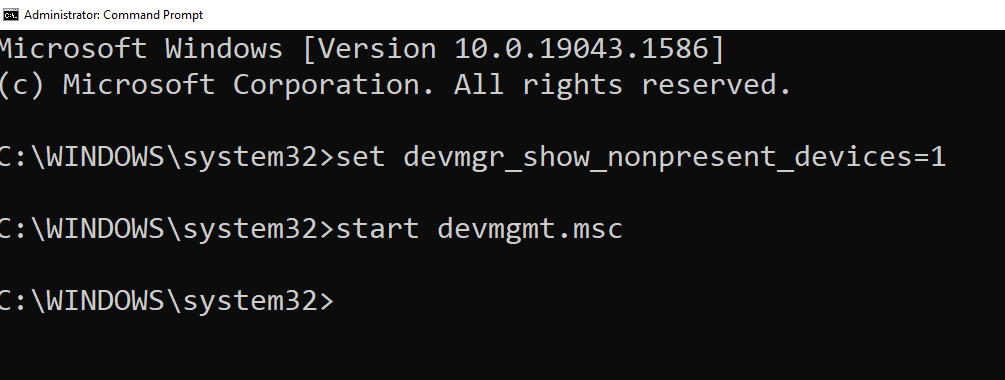
- Open the Command Prompt as administrator and start the Device Manager from the same command prompt.
- Right-click “Command Prompt” in Accessories and choose “Run as Administrator”
- Enter “set devmgr_show_nonpresent_devices=1″ – without the quotes obviously
- Enter “start devmgmt.msc”
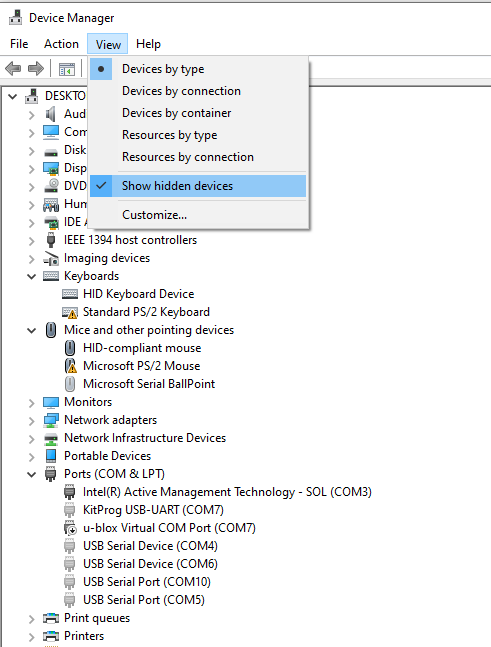
- In the box that opens, select “Show hidden devices” in the ‘view’ menu.
Now if you expand the section on COM ports, all the COM ports that have ever been created will be displayed, the non present ones being in grey. You can uninstall away anything that you don’t want (right click, select uninstall).
Specs
External links
- [https://learn.adafruit.com/adafruits-raspberry-pi-lesson-5-using-a-console-cable/test-and-configure Adafruit tutorial
- NOOBS without a display
- How COM Ports Are Allocated On Driver Installation
Troubleshooting
Raspberry Pi 3 problem described below (with solution):
With the release of the Raspberry Pi 3 the original hardware UART from the Broadcom processor
has been reassigned to the Bluetooth chipset and the UART output on the GPIO pins now uses a mini-uart port.
The mini-uart doesn't have a separate clock divisor and uses the core clock frequency.

