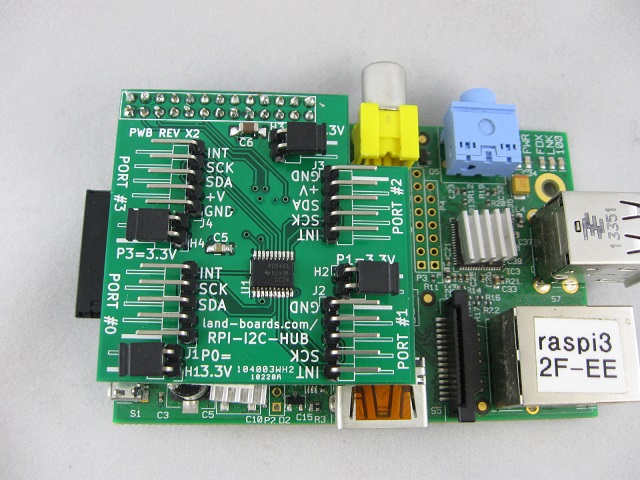
I2C Hub for the Raspberry Pi

Features
- I2C Hub / Repeater / Replicator / Multiplexer / De-multiplexer
- PCA9544A IC
- Controlled via I2C
- Multiple part vendors
- Devices with the same address can be attached to different ports
- Host I2 port goes to Raspberry Pi I2C lines
- Four I2C slave ports
- I2C ports can use the Raspberry Pi or have their own power (power source select jumper)
- A Raspberry PI which runs 3.3V can control an I2C device which runs at 5V
- Voltage translation between the ports
- I2C ports can be 3.3V or 5V
- Fits in any Raspberry Pi model
- Cutout for Model B RCA video jack
- Interrupt controller on each channel and host 100KHz/400KHz operation
- On-board termination resistors
Testing
- PCA9544 Programming
- Run with DigIO16-I2C card on Hub Port #0
- Verify that the Hub is seen from the Raspberry Pi
- Note should be -y 0 for the older revision Raspberry Pis
pi@raspi3 ~ $ sudo i2cdetect -y 1
     0  1  2  3  4  5  6  7  8  9  a  b  c  d  e  f
00:          -- -- -- -- -- -- -- -- -- -- -- -- --
10: -- -- -- -- -- -- -- -- -- -- -- -- -- -- -- --
20: -- -- -- -- -- -- -- -- -- -- -- -- -- -- -- --
30: -- -- -- -- -- -- -- -- -- -- -- -- -- -- -- --
40: -- -- -- -- -- -- -- -- -- -- -- -- -- -- -- --
50: -- -- -- -- -- -- -- -- -- -- -- -- -- -- -- --
60: -- -- -- -- -- -- -- -- -- -- -- -- -- -- -- --
70: -- 71 -- -- -- -- -- --
- Shows that there is an I2C part at 0x71
- Next, set the mux to channel #0
pi@raspi3 ~ $ sudo i2cset -y 1 0x71 0x04 0x04
- Verify that the hub is set to the port
pi@raspi3 ~ $ sudo i2cdetect -y 1
     0  1  2  3  4  5  6  7  8  9  a  b  c  d  e  f
00:          -- -- -- -- -- -- -- -- -- -- -- -- --
10: -- -- -- -- -- -- -- -- -- -- -- -- -- -- -- --
20: 20 -- -- -- -- -- -- -- -- -- -- -- -- -- -- --
30: -- -- -- -- -- -- -- -- -- -- -- -- -- -- -- --
40: -- -- -- -- -- -- -- -- -- -- -- -- -- -- -- --
50: 50 -- -- -- -- -- -- -- -- -- -- -- -- -- -- --
60: -- -- -- -- -- -- -- -- -- -- -- -- -- -- -- --
70: -- 71 -- -- -- -- -- --
- This shows the two addresses of the DigIO16-I2C
Interrupts
- (4) Active Low Inputs
- Active Low Output
- On Raspberry Pi GPIO_17
- Each GPIO pin, when configured as a general-purpose input, can be configured as an interrupt source to the ARM.
- Test code is here
Power
Connectors
J1-J4 - I2C Slave ports 0-3
- GROUND
- Power (see H1-H4 for explanation)
- SDA
- SCK
- Interrupt*
H1-H4 - I2C power source selection
- Installed - Raspberry Pi provides 3.3V power on the I2C connector power pin
- Not installed - External device provides power on the I2C connector power pin
Schematic
Example Code/Driver
Assembly Sheet

