Difference between revisions of "QT Py"

From Land Boards Wiki
Jump to navigation Jump to search
 
(107 intermediate revisions by the same user not shown)
Line 1: Line 1:
[[File:QT_Py_4600-06.jpg]]
+
[[File:tindie-mediums.png|link=https://www.tindie.com/products/27066/]]
  
<video type="youtube">0Qssr6B6MrU</video>
+
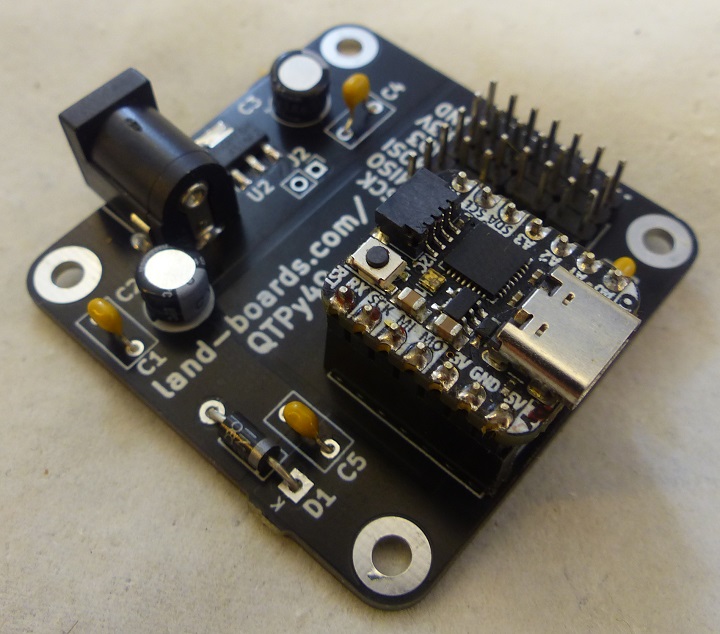
[[FILE:QTPy49_P18254-720px.jpg]]
  
== Features ==
+
<video type="youtube">iI9lUsVSuF8</video>
  
* [https://www.adafruit.com/product/4900 AdaFruit Product Page]
+
== Two Versions of the QT Py ==
* ATSAMD21E18 32-bit Cortex M0+
 
** 48 MHz 32 bit processor
 
** 256KB Flash
 
** 32 KB RAM
 
* Native USB supported by every OS - can be used in Arduino or CircuitPython as USB serial console, MIDI, Keyboard/Mouse HID, even a little disk drive for storing Python scripts.
 
* Can be used with Arduino IDE or CircuitPython
 
* Built in RGB NeoPixel LED
 
* 11 GPIO pins:
 
** True analog output on one I/O pin
 
*** Can be used to play 10-bit quality audio clips in Arduino
 
**** CircuitPython does not have storage for audio clips
 
** 9 x 12-bit analog inputs (SDA/SCL do not have analog inputs)
 
** 1 x Optional AREF on A1
 
** 9 x PWM outputs (A0 is analog out, A1 is not PWM capable)
 
** Hardware I2C port with STEMMA QT plug-n-play connector
 
** Hardware UART
 
** Hardware SPI
 
** Hardware I2S
 
** 6 x Capacitive Touch with no additional components required
 
* 3.3V regulator with [https://www.diodes.com/assets/Datasheets/AP2112.pdf 600mA peak output] AP2112
 
* Optional SOIC-8 SPI Flash chip on bottom
 
** [https://www.adafruit.com/product/4763 GD25Q16]
 
** Access the SPI flash in Arduino on SPI1 and chip select pin 17.
 
** In CircuitPython, a 'haxpress' version of the runtime will need to be installed, so it knows to look for the larger filesystem.
 
** There is more hardware support in the haxpress CircuitPython build because we can add more code to the internal flash instead of using it for a filesystem
 
* Reset switch for starting your project code over or entering bootloader mode
 
* USB Type C connector
 
* Really really small
 
  
=== Links ===
+
* AdaFruit and Seeed Studio have SAMD21 and RP2040 versions of the QT Py (XIAO on Seeed Studio) with the same form factor
 +
** [[QT Py (SAMD based)]]
 +
** [[QT Py (RP2040 based)]]
 +
* [[QTPy49|QTPy49 Breakout card]]
  
* [https://circuitpython.org/board/qtpy_m0/ Adafruit QT Py page]
+
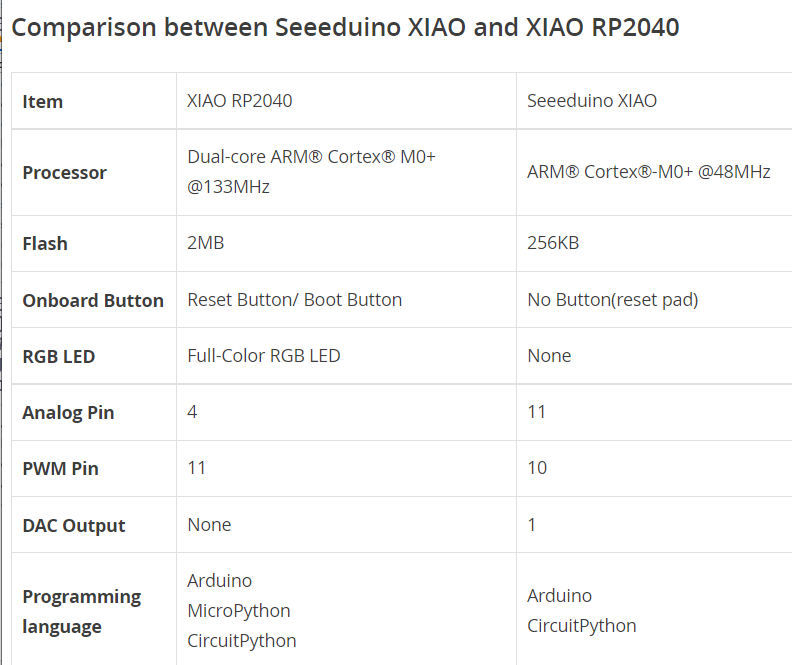
== RP2040 vs SAM version ==
* [https://learn.adafruit.com/adafruit-qt-py Adafruit Learning System for QT Py]
 
  
== Pins ==
+
* RP2040 is faster (125 MHz vs 48 MHz)
 +
* RP2040 has 2 cores vs 1
 +
* RP2040 has more Flash
 +
* RP2040 has more SRAM
 +
* The RP2040 version is more expensive, but about the same cost if the SAM version is used with an external Flash
 +
* [https://www.seeedstudio.com/blog/2020/01/09/samd21-arduino-boards-which-one-should-you-use/ SAMD21/RP2040 Arduino Boards – Which 32-bit Microcontrollers should you use?]
  
=== 3V ===
+
[[file:XIAO_SAM_vs_XIAO_RP2040.PNG]]
  
* Regulated output from the onboard regulator. You can draw 500mA
+
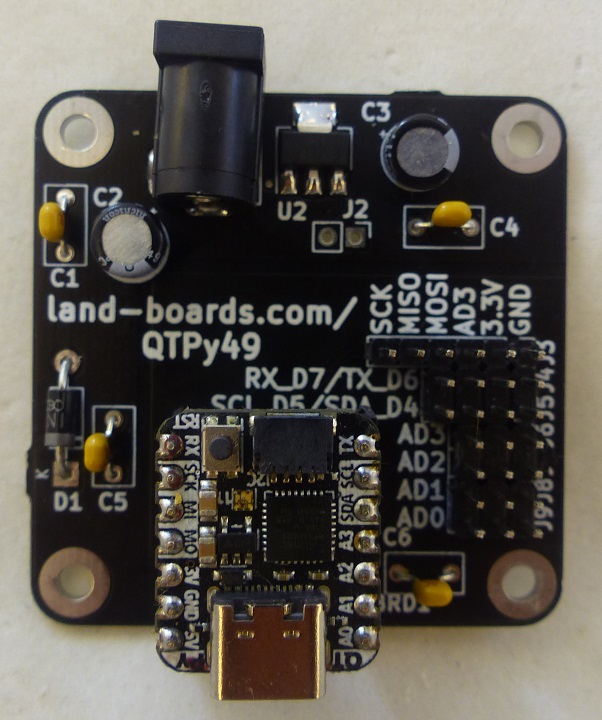
== QTPy49 Breakout Card ==
  
=== 5V ===
+
* [[QTPy49]]
  
* 5v out from the USB port.
+
[[file:QTPy49-P18253-720pxV.jpg]]
* You can also use this as a voltage input but you must have some sort of diode (schottky, signal, power, really anything) between your external power source and this pin with anode to battery, cathode to 5V pin.
 
* Note that you cannot power the USB port by supplying 5V to this pin: there is a protection diode that prevents the 5V from reaching the USB connector.
 
* This is to protect host computer USB ports, etc.


===  A0 / D0 - Digital/analog GPIO pin 0  ===


* Can act as a true analog output with 10 bit precision, but does not have PWM. Can also be a capacitive touch input.


=== A1 / D1 - Digital/analog GPIO pin 1 ===


* Can be a capacitive touch input or an AREF pin.


=== A2 / D2 - Digital/analog GPIO pin 2  ===


* Can act as PWM or capacitive touch input.


=== A3 / D3 - Digital/analog GPIO pin 3 ===


* Can act as PWM or capacitive touch input.


=== SDA / D4 ===


* This is the I2C data pin and digital pin 4, can also be a PWM
 
* There is no analog on this pin!
 
* There's no pull up on this pin by default so when using with I2C, you may need a 2.2K-10K pullup on each to 3.3V.
 
* All our STEMMA QT breakouts have the pullup installed on the breakout PCB.


===  SCL / D5 ===


* This is the I2C clock pin and digital pin 5, can also be a PWM
 
* There is no analog on this pin! There's no pull up on this pin by default so when using with I2C, you may need a 2.2K-10K pullup on each to 3.3V


=== TX / A6 / D6 ===


* Transmit (output) for Serial1
 
* Also analog/digital GPIO 6.
 
* Can act as PWM or capacitive touch input.


=== RX / A7 / D7 ===


* Receive (input) for Serial1
 
* Also analog/digital GPIO 7.
 
* Can act as PWM or capacitive touch input.*


=== SCK / A8 / D8 ===


* Hardware SPI clock pin
 
* Also analog/digital GPIO 8. Can act as PWM output.


=== MISO / A9 / D9 ===


* Also analog/digit* Hardware SPI MISO microcontroller in serial out pin
 
al GPIO 9. Can act as PWM output.


=== MOSI / A10 / D10 ===


* Hardware SPI MOSI microcontroller out serial in pin
 
* Also analog/digital GPIO 10. Can act as PWM output.


=== NeoPixel ===


* Connected to digital pin 11 for signal
 
* If you would like to turn off the pixel for low power usage, set pin 12 low.
 
* By default pin 12 is set high for you by Arduino/CircuitPython


== Pins ==


=== 3V ===


* Regulated output from the onboard regulator. You can draw 500mA


=== 5V ===


* 5v out from the USB port.
 
* You can also use this as a voltage input but you must have some sort of diode (schottky, signal, power, really anything) between your external power source and this pin with anode to battery, cathode to 5V pin.
 
* Note that you cannot power the USB port by supplying 5V to this pin: there is a protection diode that prevents the 5V from reaching the USB connector.
 
* This is to protect host computer USB ports, etc.


===  A0 / D0 - Digital/analog GPIO pin 0  ===


* Can act as a true analog output with 10 bit precision, but does not have PWM. Can also be a capacitive touch input.


=== A1 / D1 - Digital/analog GPIO pin 1 ===


* Can be a capacitive touch input or an AREF pin.


=== A2 / D2 - Digital/analog GPIO pin 2  ===


* Can act as PWM or capacitive touch input.


=== A3 / D3 - Digital/analog GPIO pin 3 ===


* Can act as PWM or capacitive touch input.


=== SDA / D4 - This is the I2C data pin and digital pin 4, can also be a PWM ===


* There is no analog on this pin!
 
* There's no pull up on this pin by default so when using with I2C, you may need a 2.2K-10K pullup on each to 3.3V.
 
* All our STEMMA QT breakouts have the pullup installed on the breakout PCB.


===  SCL / D5 - This is the I2C clock pin and digital pin 5, can also be a PWM ===


* There is no analog on this pin! There's no pull up on this pin by default so when using with I2C, you may need a 2.2K-10K pullup on each to 3.3V


=== TX / A6 / D6 - Transmit (output) for Serial1 ===


* Also analog/digital GPIO 6.
 
* Can act as PWM or capacitive touch input.


=== RX / A7 / D7 - Receive (input) for Serial1 ===


* Also analog/digital GPIO 7.
 
* Can act as PWM or capacitive touch input.*


=== SCK / A8 / D8 - Hardware SPI clock pin ===
 
* Also analog/digital GPIO 8. Can act as PWM output.


=== MISO / A9 / D9 -  Hardware SPI MISO microcontroller in serial out pin ===


* Also analog/digital GPIO 9. Can act as PWM output.


=== MOSI / A10 / D10 - Hardware SPI MOSI microcontroller out serial in pin ===


* Also analog/digital GPIO 10. Can act as PWM output.


=== NeoPixel connected to digital pin 11 for signal ===


* If you would like to turn off the pixel for low power usage, set pin 12 low.
 
* By default pin 12 is set high for you by Arduino/CircuitPython


== Programming ==


* C/C++ or CircuitPython


=== C/C++ ===


* [https://github.com/raspberrypi/pico-sdk C/C++ SDK]


=== MicroPython ===


* [https://github.com/micropython/micropython/tree/master/ports/rp2 MicroPython Repo]


=== CircuitPython ===


* Adafruit CircuitPython 6.1.0 on 2021-01-21; Adafruit QT Py M0 Haxpress with samd21e18
 
* [https://circuitpython.readthedocs.io/en/latest/README.html CircuitPython] is a derivative of MicroPython.
 
* [https://circuitpython.org/board/qtpy_m0_haxpress/ QT Py Haxpress] used with 2MB Flash EEPROM
 
* [https://github.com/adafruit/Adafruit_Learning_System_Guides/blob/master/Welcome_to_CircuitPython/QT_Py_blink.py blink.py for QT Py]
 
* [https://codewith.mu/ Mu editor]
 
* CircuitPython looks for a code file on the board to run
 
** There are four options: code.txt, code.py, main.txt and main.py
 
** CircuitPython looks for those files, in that order, and then runs the first one it finds
 
* How do I check how much memory I have free?
 
<pre>
 
import gc
 
gc.mem_free()
 
</pre>
 
* Reports about 19KB of free space


Will give you the number of bytes available for use.


==== Land Boards Python Code ====


* [https://github.com/land-boards/lb-boards/tree/master/Projects/QTPy/Land%20Boards GitHub]


==== Digital I/O Example ====


<pre>
 
import board
 
import digitalio
 
import time


led = digitalio.DigitalInOut(board.D13)
 
led.direction = digitalio.Direction.OUTPUT


while True:
 
    led.value = True
 
    time.sleep(0.1)
 
    led.value = False
 
    time.sleep(0.5)
 
</pre>


== Flash EEPROM 2 MB ==


[[File:QT_Py_4600-07.jpg]]
 

Latest revision as of 19:31, 24 July 2022

Tindie-mediums.png

QTPy49 P18254-720px.jpg

Two Versions of the QT Py

RP2040 vs SAM version

XIAO SAM vs XIAO RP2040.PNG

QTPy49 Breakout Card

QTPy49-P18253-720pxV.jpg