Difference between revisions of "PiPicoMite03"
Blwikiadmin (talk | contribs) |
Blwikiadmin (talk | contribs) |
||
| (45 intermediate revisions by 2 users not shown) | |||
| Line 1: | Line 1: | ||
| − | [[File:tindie-mediums.png|link=https://www.tindie.com/products/ | + | [[File:tindie-mediums.png|link=https://www.tindie.com/products/land_boards/raspberry-pi-pico-card-with-vga-sound-kbd-v3/]] |
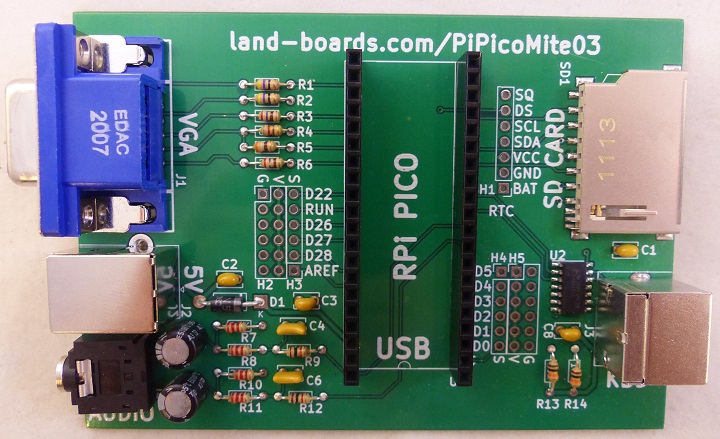
* Assembled board will ship as | * Assembled board will ship as | ||
| − | [[file: | + | [[file:PiPicoMite03_P18397-720px.jpg]] |
<video type="youtube">5dcnrLDzjdU</video> | <video type="youtube">5dcnrLDzjdU</video> | ||
| + | |||
| + | == Card Versions == | ||
| + | |||
| + | * There are three versions of this card | ||
| + | ** [[PiPicoMite01]] | ||
| + | *** Has 16-bit port I/O expander | ||
| + | *** 120x70mm with (4) 6-32 mounting holes | ||
| + | ** [[PiPicoMite02]] | ||
| + | *** Has 32-bit port I/O expander(s) | ||
| + | *** 95x95mm with (4) 6-32 mounting holes | ||
| + | ** [[PiPicoMite03]] (this version) | ||
| + | *** 99.5x69.5mm - Fits into extruded Aluminum Enclosure | ||
| + | *** Fully functional, reduced cost | ||
== Features == | == Features == | ||
| Line 23: | Line 36: | ||
** Up to 32GB | ** Up to 32GB | ||
** FAT32 format | ** FAT32 format | ||
| + | ** [https://www.amazon.com/SanDisk-3-Pack-Ultra-Memory-3x32GB/dp/B08GY9575R/ref=sr_1_3?keywords=sandisk%2B32gb%2Bsd%2Bcard&qid=1657457739&sprefix=sandisk%2B32GB%2Caps%2C85&sr=8-3&th=1 Tested/worked] | ||
* Stereo audio | * Stereo audio | ||
** PWM with filter | ** PWM with filter | ||
** 3.5mm jack | ** 3.5mm jack | ||
| + | ** [https://www.amazon.com/dp/B000R9AAJA?psc=1&ref=ppx_yo2ov_dt_b_product_details Cheap speakers] | ||
* 5V power input on USB B | * 5V power input on USB B | ||
** Power only (not data) | ** Power only (not data) | ||
| + | ** Measured 40 mA at 5,24V in | ||
* 99.5mmx69.5mm outline | * 99.5mmx69.5mm outline | ||
** Board is designed to fit into Aluminum Project Box Enclosure DIY 100*76*35mm - [https://www.ebay.com/sch/i.html?_from=R40&_trksid=p2334524.m570.l1313&_nkw=100*76*35mm+aluminum&_sacat=0&LH_TitleDesc=0&_odkw=100*76*35mm+Aluminum+PCB+Instrument+Box+Enclosure+Electronic+Project+Case+Set&_id=174408274566 ebay search] | ** Board is designed to fit into Aluminum Project Box Enclosure DIY 100*76*35mm - [https://www.ebay.com/sch/i.html?_from=R40&_trksid=p2334524.m570.l1313&_nkw=100*76*35mm+aluminum&_sacat=0&LH_TitleDesc=0&_odkw=100*76*35mm+Aluminum+PCB+Instrument+Box+Enclosure+Electronic+Project+Case+Set&_id=174408274566 ebay search] | ||
| Line 40: | Line 56: | ||
=== BASIC Interpreter === | === BASIC Interpreter === | ||
| − | The PicoMiteVGA boots straight into the MMBasic prompt. At which point you can enter, edit and save the program, test BASIC commands and run the program. | + | The [https://geoffg.net/picomitevga.html PicoMiteVGA] boots straight into the MMBasic prompt. At which point you can enter, edit and save the program, test BASIC commands and run the program. |
| − | MMBasic is a Microsoft BASIC compatible implementation of the BASIC language, originally written by Geoff Graham and enhanced and ported to the Pico by Peter Mather, who also designed the original PicoMite on which | + | MMBasic is a Microsoft BASIC compatible implementation of the BASIC language, originally written by Geoff Graham and enhanced and ported to the Pico by Peter Mather, who also designed the original PicoMite on which this design is based. It is full featured with floating point, 64-bit integers and string variables, long variable names, arrays of floats, integers or strings with multiple dimensions, extensive string handling and user defined subroutines and functions. Typically it will execute a program up to 100,000 lines per second. Embedded compiled C programs can be used for even higher performance. |
Using MMBasic you can use communications protocols such as I2C or SPI to get data from a variety of sensors. You can save data to an SD card, measure voltages, detect digital inputs and drive output pins to turn on lights, relays, etc. | Using MMBasic you can use communications protocols such as I2C or SPI to get data from a variety of sensors. You can save data to an SD card, measure voltages, detect digital inputs and drive output pins to turn on lights, relays, etc. | ||
The emphasis with MMBasic is on ease of use and development. The development cycle is very fast with the ability to instantly switch from edit to run. Errors are listed in plain English and when an error does occur a single keystroke will invoke the built in editor with the cursor positioned on the line that caused the error. | The emphasis with MMBasic is on ease of use and development. The development cycle is very fast with the ability to instantly switch from edit to run. Errors are listed in plain English and when an error does occur a single keystroke will invoke the built in editor with the cursor positioned on the line that caused the error. | ||
| + | |||
| + | ==== MMBASIC Credits ==== | ||
| + | |||
| + | Peter Mather led the project, ported the MMBasic interpreter to the Raspberry Pi Pico and wrote the hardware device drivers. Geoff Graham wrote the MMBasic interpreter and the manual. Mick Ames wrote the PIO compiler and its corresponding documentation. The VGA driver code was derived from work by Miroslav Nemecek. | ||
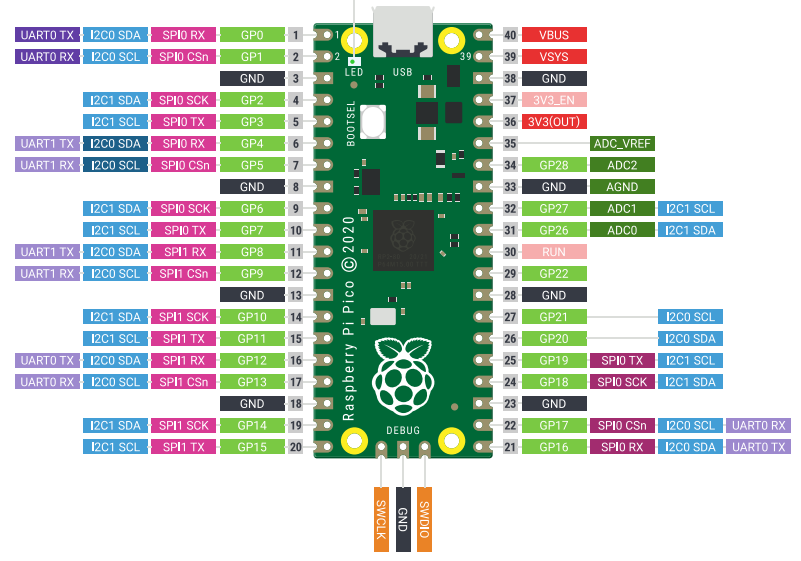
=== Raspberry Pi Pico Pinout (Reference) === | === Raspberry Pi Pico Pinout (Reference) === | ||
| Line 54: | Line 74: | ||
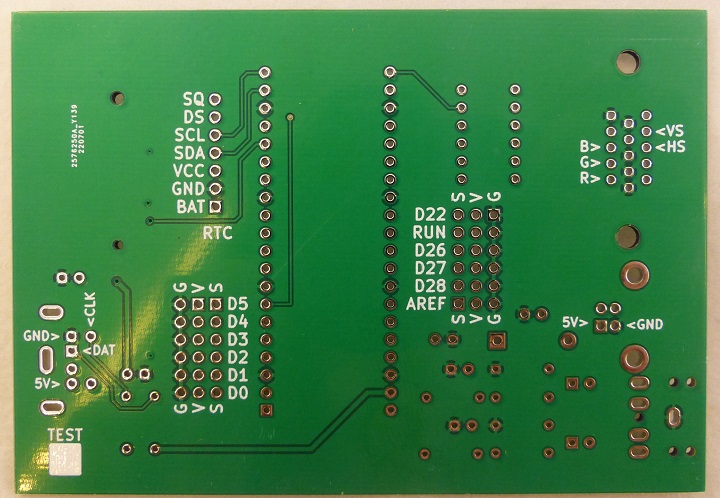
== Pin Marking on Rear == | == Pin Marking on Rear == | ||
| − | [[file: | + | [[file:PiPicoMite03_P18400-720px.jpg]] |
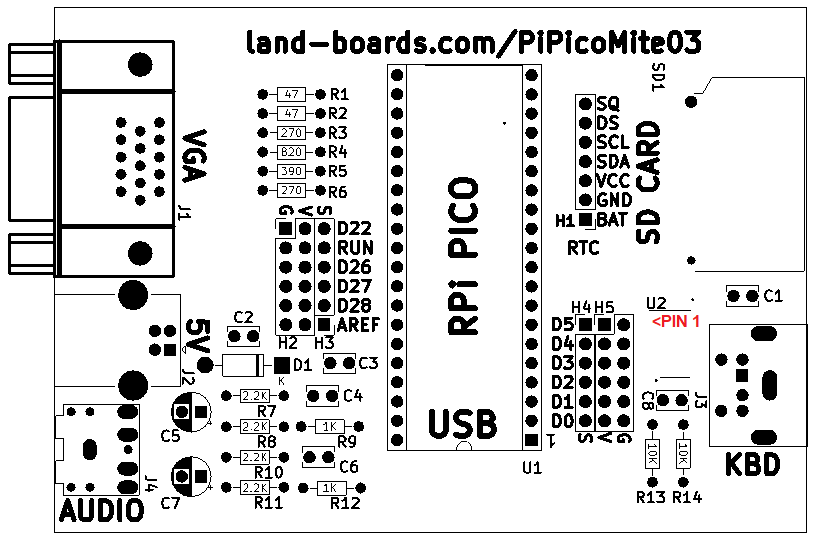
== Schematic == | == Schematic == | ||
| Line 125: | Line 145: | ||
==== RTC / Digital Thermometer ==== | ==== RTC / Digital Thermometer ==== | ||
| − | * | + | * Optional [https://www.ebay.com/sch/i.html?_from=R40&_trksid=p2334524.m570.l1313&_nkw=DS1307&_sacat=0&LH_TitleDesc=0&_odkw=100*76*35mm+aluminum&_osacat=0&_id=174408274566 DS1307 Real Time Clocks module] |
** DS1307 I2C real time clock chip (RTC) | ** DS1307 I2C real time clock chip (RTC) | ||
** 24C32 32K I2C EEPROM memory | ** 24C32 32K I2C EEPROM memory | ||
| Line 143: | Line 163: | ||
[[file:RTC_BatterySide.PNG]] | [[file:RTC_BatterySide.PNG]] | ||
| + | |||
| + | * With RTC installed | ||
| + | * Fits within box with plenty of clearance | ||
| + | * Can be mounted with either a 7-pin female header or RTC pins soldered directly to board | ||
| + | |||
| + | [[file:PiPicoMite03_P18408-720px.jpg]] | ||
=== H2-H5 - Pico GVS Connectors === | === H2-H5 - Pico GVS Connectors === | ||
| Line 185: | Line 211: | ||
OPTION SDCARD GP13, GP10, GP11, GP12 | OPTION SDCARD GP13, GP10, GP11, GP12 | ||
OPTION AUDIO GP6, GP7, ON PWM CHANNEL 3 | OPTION AUDIO GP6, GP7, ON PWM CHANNEL 3 | ||
| − | OPTION SYSTEM | + | OPTION SYSTEM I2C GP14, GP15 |
</pre> | </pre> | ||
| Line 196: | Line 222: | ||
** Beta [https://www.thebackshed.com/forum/ViewTopic.php?FID=16&TID=14854#186644 V5.07.05b2] | ** Beta [https://www.thebackshed.com/forum/ViewTopic.php?FID=16&TID=14854#186644 V5.07.05b2] | ||
** [https://github.com/land-boards/RasPiPico/tree/main/PicoMite_MMBASIC/PicoMite_VGA/PicoMiteVGA_Firmware Copies of firmware versions] - some have unstable video mode 1 | ** [https://github.com/land-boards/RasPiPico/tree/main/PicoMite_MMBASIC/PicoMite_VGA/PicoMiteVGA_Firmware Copies of firmware versions] - some have unstable video mode 1 | ||
| + | * [https://www.thebackshed.com/forum/ViewTopic.php?TID=14854&P=1 TheBackshed forum] - support | ||
* If the Pico does not already have MMBASIC installed | * If the Pico does not already have MMBASIC installed | ||
* Hold button on Pico while plugging in USB Micro to PC | * Hold button on Pico while plugging in USB Micro to PC | ||
| Line 217: | Line 244: | ||
<pre> | <pre> | ||
OPTION SDCARD GP13, GP10, GP11, GP12 | OPTION SDCARD GP13, GP10, GP11, GP12 | ||
| − | OPTION AUDIO GP6, GP7 | + | OPTION AUDIO GP6, GP7 |
| − | OPTION SYSTEM | + | OPTION SYSTEM I2C GP14, GP15 |
OPTION COLOURCODE ON | OPTION COLOURCODE ON | ||
OPTION KEYBOARD US | OPTION KEYBOARD US | ||
| Line 230: | Line 257: | ||
* [https://github.com/UKTailwind/PicoMite/tree/main/PicoMite PicoMite Source code] | * [https://github.com/UKTailwind/PicoMite/tree/main/PicoMite PicoMite Source code] | ||
** [https://github.com/UKTailwind/PicoMite-VGA-Edition Extra/replacement files for VGA] | ** [https://github.com/UKTailwind/PicoMite-VGA-Edition Extra/replacement files for VGA] | ||
| + | |||
| + | == CircuitPython on PiPicoMite0x Cards == | ||
| + | |||
| + | * The PiPicoMite0x cards can run CircuitPython with some limitations | ||
| + | * Card features for CircuitPython application | ||
| + | ** SD support | ||
| + | ** 5V input | ||
| + | ** External I2C | ||
| + | * CircuitPython does not have built-in support for | ||
| + | ** VGA | ||
| + | ** PS/2 | ||
| + | ** Audio | ||
== Factory Test Procedure == | == Factory Test Procedure == | ||
| − | * | + | * Test assembled cards using this procedure |
| + | * MMBASIC is already set up on the card | ||
=== Equipment === | === Equipment === | ||
| Line 241: | Line 281: | ||
* Stereo amplified speakers | * Stereo amplified speakers | ||
* PS/2 keyboard | * PS/2 keyboard | ||
| − | * | + | * MMBASIC SD card with contents |
| + | ** [https://github.com/land-boards/RasPiPico/tree/main/PicoMite_MMBASIC/PicoMite_VGA/Land%20Boards%20BASIC%20Programs Test Software repo] | ||
* Raspberry Pi Pico with MMBASIC installed | * Raspberry Pi Pico with MMBASIC installed | ||
| − | * PC running TeraTerm | + | * PC running [http://www.teraterm.org/ TeraTerm] |
=== Test SD card interface === | === Test SD card interface === | ||
| Line 267: | Line 308: | ||
=== Test Sound === | === Test Sound === | ||
| + | * Loads [https://github.com/land-boards/RasPiPico/blob/main/PicoMite_MMBASIC/PicoMite_VGA/Land%20Boards%20BASIC%20Programs/wave/sample4.wav sample4.wav file] | ||
* Type | * Type | ||
| + | |||
<pre> | <pre> | ||
chdir "/wave" | chdir "/wave" | ||
play wav "sample4.wav" | play wav "sample4.wav" | ||
| + | |||
</pre> | </pre> | ||
| + | |||
* Sound should come out of speakers | * Sound should come out of speakers | ||
* Stop with | * Stop with | ||
| + | |||
<pre> | <pre> | ||
play stop | play stop | ||
| + | |||
| + | </pre> | ||
| + | |||
| + | === Test Keyboard === | ||
| + | |||
| + | * Type on keyboard | ||
| + | * Verify keys show up on VGA | ||
| + | |||
| + | === Test VGA === | ||
| + | |||
| + | * Type | ||
| + | |||
| + | <pre> | ||
| + | chdir "/demos" | ||
| + | load "Colours.bas" | ||
| + | run | ||
| + | |||
| + | </pre> | ||
| + | |||
| + | * Verify 16 distinct colors on VGA | ||
| + | * Type | ||
| + | |||
| + | <pre> | ||
| + | mode 1 | ||
| + | |||
</pre> | </pre> | ||
| Line 289: | Line 360: | ||
<pre> | <pre> | ||
| − | option system i2c | + | option system i2c gp14, gp15 |
| + | rtc gettime | ||
| + | print time$ | ||
| + | </pre> | ||
| + | |||
| + | === Combined Copy/Paste === | ||
| + | |||
| + | * Above tests can be copy/pasted | ||
| + | |||
| + | <pre> | ||
| + | files | ||
| + | |||
| + | chdir "/demos" | ||
| + | load "Colours.bas" | ||
| + | run | ||
| + | chdir "/wave" | ||
| + | play wav "sample4.wav" | ||
| + | |||
| + | play stop | ||
| + | |||
| + | mode 1 | ||
| + | |||
| + | option system i2c gp14, gp15 | ||
rtc gettime | rtc gettime | ||
print time$ | print time$ | ||
| Line 295: | Line 388: | ||
== Enclosure == | == Enclosure == | ||
| + | |||
| + | * Panel cutouts | ||
| + | ** [https://github.com/land-boards/lb-boards/blob/master/Raspberry%20Pi%20Cards/PiPicoMite03/Pics/Conns/PiPicoMite03_Panel_Cutouts.pdf PiPicoMite03 Panel Cutouts] pdf file | ||
| + | ** Print and use to cut the panel holes | ||
| + | |||
| + | [[file:PiPicoMite03_PanelCutouts.PNG]] | ||
* 99.5mmx69.5mm outline | * 99.5mmx69.5mm outline | ||
| Line 307: | Line 406: | ||
[[file:PiPicoMite03_Enclosure_Mechs.PNG]] | [[file:PiPicoMite03_Enclosure_Mechs.PNG]] | ||
| − | == 3D | + | === 3D Printable End Panels === |
| + | |||
| + | * [https://www.printables.com/model/395379-pipicomite03-picomitevga-end-panels 3D End Panels] | ||
| + | * Credit to [https://www.printables.com/social/171430-rfinnie/about customer] | ||
| + | |||
| + | [[file:pipicomite03-panels.png]] | ||
| − | [[file: | + | [[file:pipicomite03-panel-ps2-end.png]] |
== Mechanicals == | == Mechanicals == | ||
| Line 324: | Line 428: | ||
=== Rev 1 === | === Rev 1 === | ||
| − | * | + | * Tested, working, no issues |
== Assembly Sheet == | == Assembly Sheet == | ||
| − | |||
| − | |||
* [[PiPicoMite03 Rev1 Assembly Sheet]] | * [[PiPicoMite03 Rev1 Assembly Sheet]] | ||
| + | * [http://land-boards.com/PiPicoMite03/PiPicoMite03_Rev1_ibom.html PiPicoMite03 Rev 1 Interactive BOM] | ||
Latest revision as of 19:10, 20 March 2023
- Assembled board will ship as
Contents
Card Versions
- There are three versions of this card
- PiPicoMite01
- Has 16-bit port I/O expander
- 120x70mm with (4) 6-32 mounting holes
- PiPicoMite02
- Has 32-bit port I/O expander(s)
- 95x95mm with (4) 6-32 mounting holes
- PiPicoMite03 (this version)
- 99.5x69.5mm - Fits into extruded Aluminum Enclosure
- Fully functional, reduced cost
- PiPicoMite01
Features
- Raspberry Pi Pico
- Spare Pico pins brought to headers
- Spare Pico pin marking on rear
- Spare Pico pins brought to headers
- VGA
- 640x480 monochrome resolution
- 320x240 colour resolution
- 1:2:1 - R:G:B - 16 colours
- PS/2 Keyboard
- 5V to keyboard with voltage translator on clock/data lines
- Does not require a keyboard that runs at 3.3V
- SD Card
- Full size card
- Up to 32GB
- FAT32 format
- Tested/worked
- Stereo audio
- PWM with filter
- 3.5mm jack
- Cheap speakers
- 5V power input on USB B
- Power only (not data)
- Measured 40 mA at 5,24V in
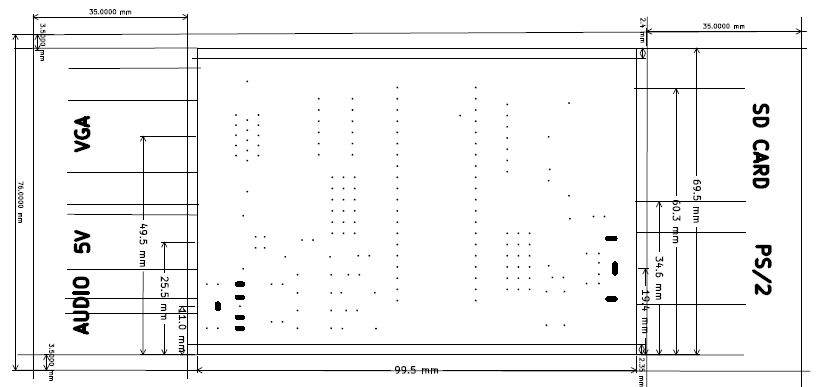
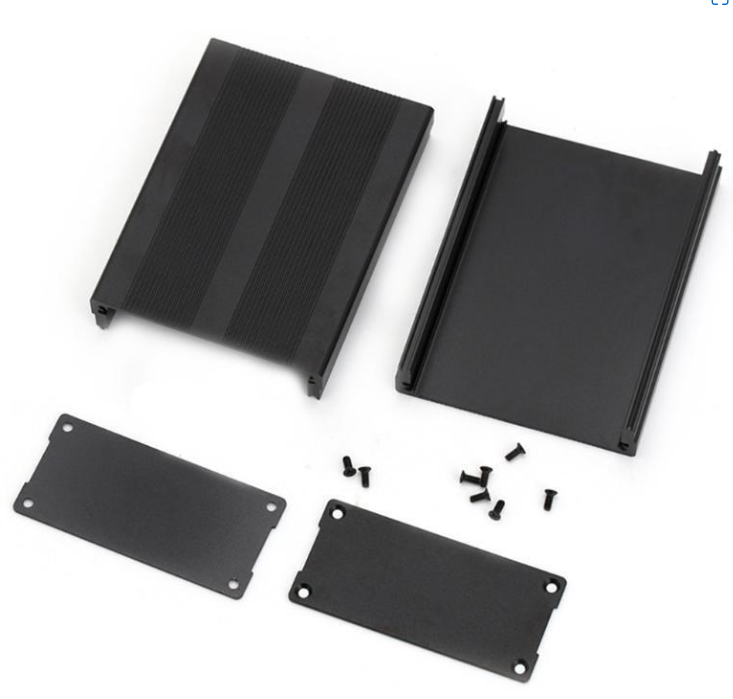
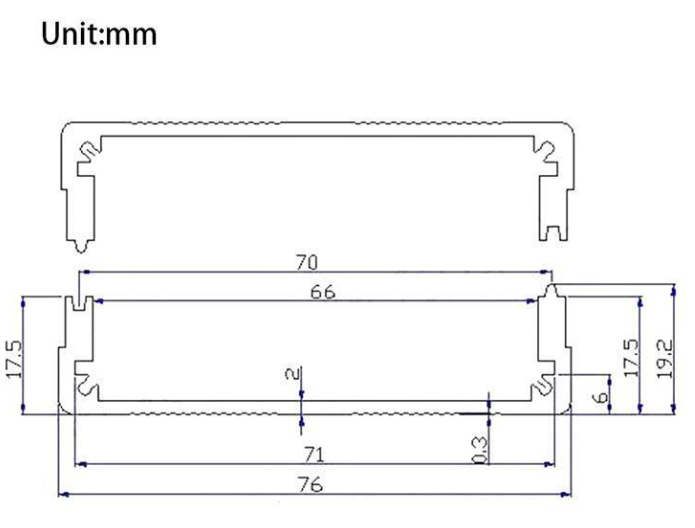
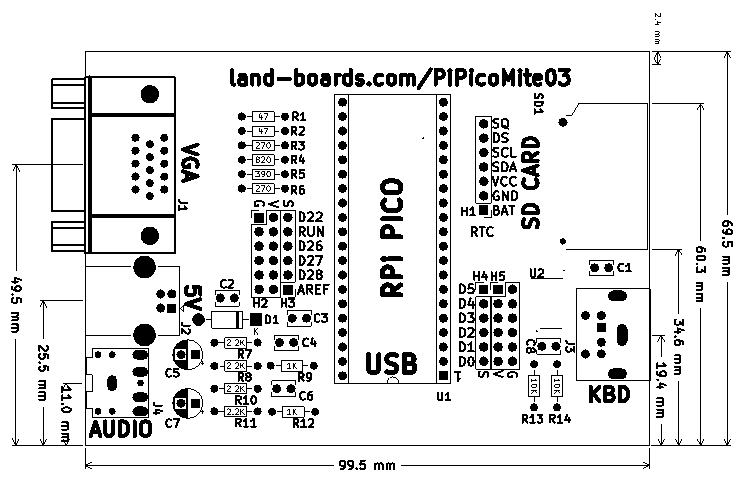
- 99.5mmx69.5mm outline
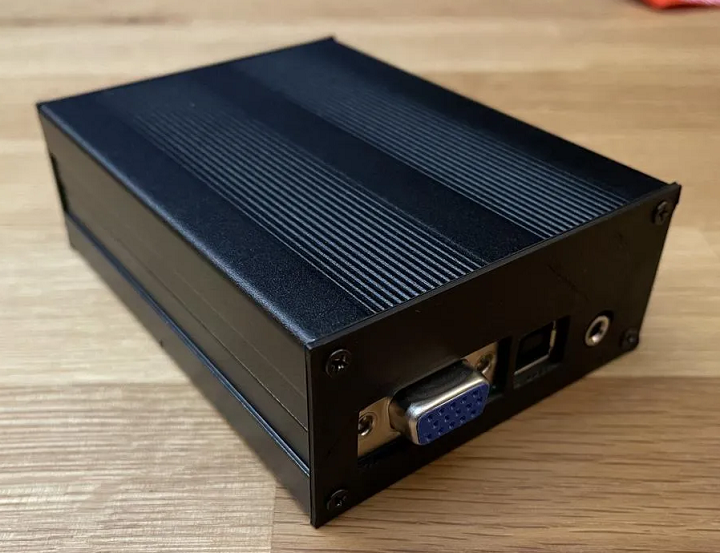
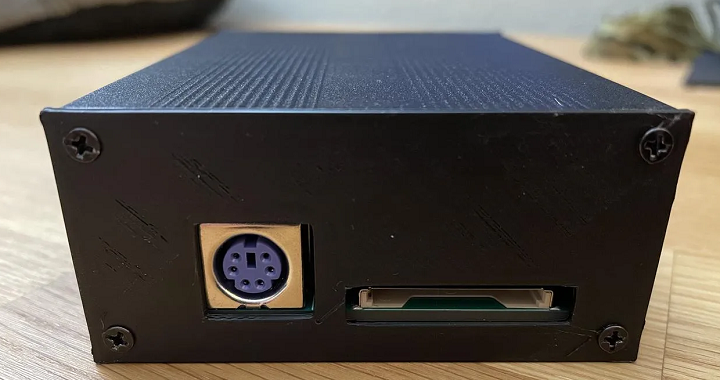
- Board is designed to fit into Aluminum Project Box Enclosure DIY 100*76*35mm - ebay search
- VGA, USB B (Power), 3.5mm Audio on one end
- Keyboard, SD card on the opposite end
- Optional DS1307 Real time Clock (RTC) / Digital Thermometer
- On I2C1 bus (I2C2 from MMBASIC)
- 27 x 28 x 8.4mm
- DS1307 RTC
- DS18B20 Digital Thermometer
BASIC Interpreter
The PicoMiteVGA boots straight into the MMBasic prompt. At which point you can enter, edit and save the program, test BASIC commands and run the program.
MMBasic is a Microsoft BASIC compatible implementation of the BASIC language, originally written by Geoff Graham and enhanced and ported to the Pico by Peter Mather, who also designed the original PicoMite on which this design is based. It is full featured with floating point, 64-bit integers and string variables, long variable names, arrays of floats, integers or strings with multiple dimensions, extensive string handling and user defined subroutines and functions. Typically it will execute a program up to 100,000 lines per second. Embedded compiled C programs can be used for even higher performance.
Using MMBasic you can use communications protocols such as I2C or SPI to get data from a variety of sensors. You can save data to an SD card, measure voltages, detect digital inputs and drive output pins to turn on lights, relays, etc.
The emphasis with MMBasic is on ease of use and development. The development cycle is very fast with the ability to instantly switch from edit to run. Errors are listed in plain English and when an error does occur a single keystroke will invoke the built in editor with the cursor positioned on the line that caused the error.
MMBASIC Credits
Peter Mather led the project, ported the MMBasic interpreter to the Raspberry Pi Pico and wrote the hardware device drivers. Geoff Graham wrote the MMBasic interpreter and the manual. Mick Ames wrote the PIO compiler and its corresponding documentation. The VGA driver code was derived from work by Miroslav Nemecek.
Raspberry Pi Pico Pinout (Reference)
Pin Marking on Rear
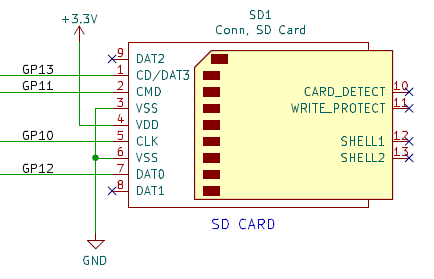
Schematic
Connectors / Headers
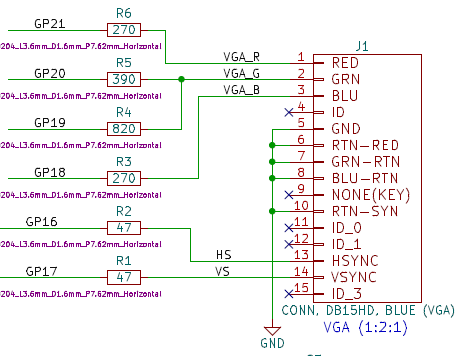
J1 - VGA
The VGA output is 640 x 480 pixels in monochrome mode or 320 x 240 pixels in colour mode with 16 colours (1 bit for red, 2 bits for green and 1 bit for blue). The VGA output is generated using the second CPU on the RP2040 processor plus one PIO channel so it does not affect the BASIC interpreter which runs at full speed on the first CPU. A handfull of components (resistors and a couple of diodes) is all that is required to connect the VGA monitor.
From within your BASIC program you can turn pixels on/off and draw lines, boxes and circles in any colour. Text can be positioned anywhere on the screen and displayed in any colour in a variety of fonts.
The built-in editor within MMBasic works perfectly with the VGA monitor and PS2 keyboard to allow programs to be edited (with colour coded text) and saved to an SD card.
Mode 1 (640x480 monochrome) and mode 2 (320x240 16-colours).
OPTION COLOURCODE ON
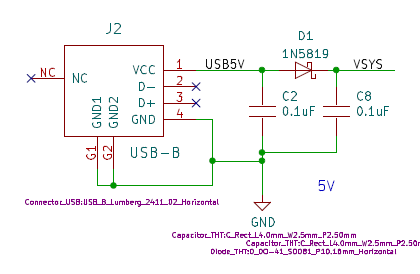
J2 - USB B Power Connector
- Full size USB B connector
- No USB signal connections, just used for power
J3 - PS/2 Keyboard
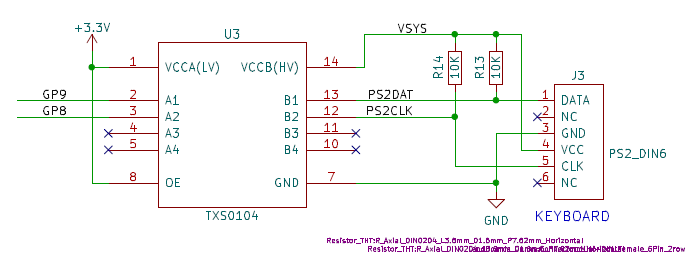
The PS2 keyboard connects to the Raspberry Pi Pico via a level shifter and works as a normal keyboard with the function keys and arrow keys fully operational. It can be configured for the standard US layout used in the USA, Australia and New Zealand or specialised layouts used in the United Kingdom, Germany, France and Spain.
- 5V keyboard (VSYS)
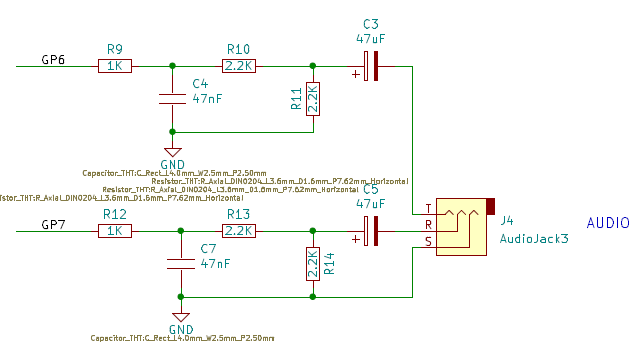
J4 - Audio
- Low Pass filter
- Resistive voltage divider to get to line level
- Two Tone Test
- Play a WAV file
OPTION AUDIO GP6, GP7
PLAY WAV "file.wav"
PLAY STOP
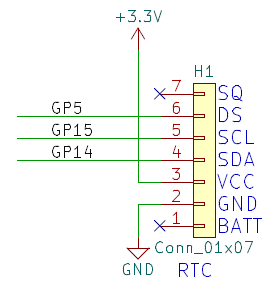
H1 - I2C1, RTC
- VBAT (N/C)
- GND
- VCC
- I2C1_SDA (GP14)
- I2C1_SCL (GP15)
- DS (GP5)
- SQ (M/C)
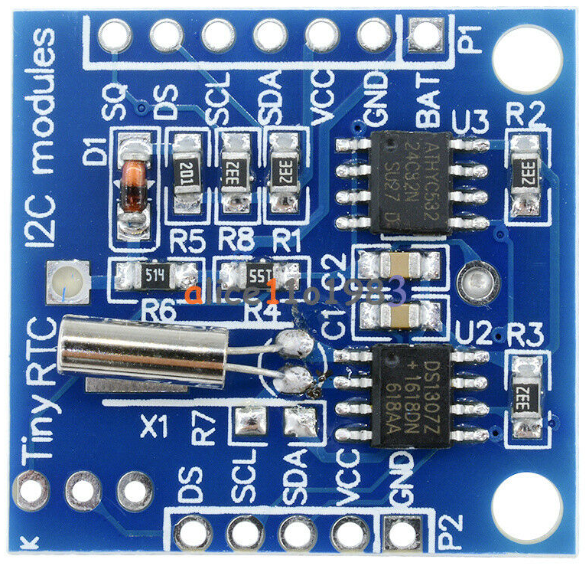
RTC / Digital Thermometer
- Optional DS1307 Real Time Clocks module
- DS1307 I2C real time clock chip (RTC)
- 24C32 32K I2C EEPROM memory
- LIR2032 rechargeable Lithium battery with charging circuit
- With new battery, can power DS1307 module for 1 year
- Compact design 27 x 28 x 8.4mm
- Can install DS18B20 digital temperature sensor on module
- Connects to GP5 pin
option system i2c2 gp14, gp15
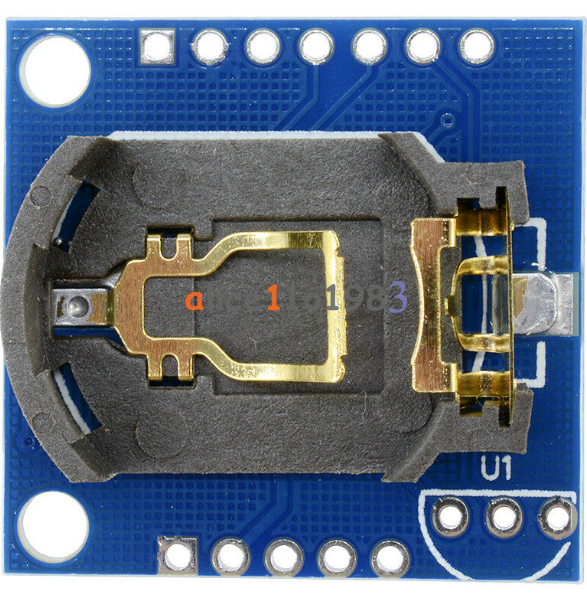
- Installs battery side up
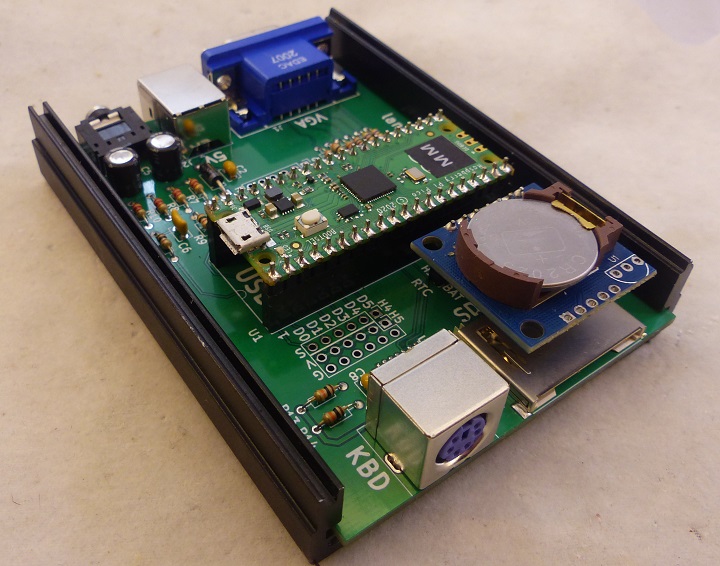
- With RTC installed
- Fits within box with plenty of clearance
- Can be mounted with either a 7-pin female header or RTC pins soldered directly to board
H2-H5 - Pico GVS Connectors
- Spare Pico pins are brought out to GVS headers
- Connectors are adjacent for GVS connections via 1x3 Dupont housings
- H2/H3 adjacent to each other
- H3-1 = ADCREF
- H3-2 = GP28
- H3-3 = GP27
- H3-4 = GP26
- H3-5 = RUN
- H3-6 = GP22
- H4/H5 adjacent to each other
- H4-1 = GP5
- H4-2 = GP4
- H4-3 = GP3
- H4-4 = GP2
- H4-5 = GP1
- H5-6 = GP0
SD Card
The PicoMiteVGA firmware reserves eight program storage "slots" in the Raspberry Pi Pico flash memory. Programs can be saved and retreived from these without the need for any additional storage.
For more storage SD cards can be connected with full support for these built into MMBasic including the ability to open files for reading, writing or random access and loading and saving programs. SD cards connect directly to the Raspberry Pi Pico and the firmware will work with cards up to 32GB formatted in FAT16 or FAT32. The files created can be read and written on personal computers running Windows, Linux or the Mac operating system.
OPTION SDCARD GP13, GP10, GP11, GP12
Configuration Options
> OPTION LIST
OPTION COLOURCODE ON
OPTION KEYBOARD US
OPTION SDCARD GP13, GP10, GP11, GP12
OPTION AUDIO GP6, GP7, ON PWM CHANNEL 3
OPTION SYSTEM I2C GP14, GP15
PicoMiteVGA Software
Download MMBASIC
- Tested with "VGA only" versions
- Released V5.07.04
- Beta V5.07.05b2
- Copies of firmware versions - some have unstable video mode 1
- TheBackshed forum - support
- If the Pico does not already have MMBASIC installed
- Hold button on Pico while plugging in USB Micro to PC
- Drive will open
- Drop VGA uf2 onto Drive
- System will reboot
> print mm.ver
 5.070502
- Run TeraTerm
- Connect to Serial
Configure MMBASIC
- Setups
- Can copy-paste a line at a time into TeraTerm
- Some options will reboot the card
OPTION SDCARD GP13, GP10, GP11, GP12
OPTION AUDIO GP6, GP7
OPTION SYSTEM I2C GP14, GP15
OPTION COLOURCODE ON
OPTION KEYBOARD US
- Remove USB power
- Install SD card
- Apply USB power
PicoMite Source code
CircuitPython on PiPicoMite0x Cards
- The PiPicoMite0x cards can run CircuitPython with some limitations
- Card features for CircuitPython application
- SD support
- 5V input
- External I2C
- CircuitPython does not have built-in support for
- VGA
- PS/2
- Audio
Factory Test Procedure
- Test assembled cards using this procedure
- MMBASIC is already set up on the card
Equipment
- Unit Under Test (UUT)
- VGA monitor
- Stereo amplified speakers
- PS/2 keyboard
- MMBASIC SD card with contents
- Raspberry Pi Pico with MMBASIC installed
- PC running TeraTerm
Test SD card interface
- Type
files
- Returns
A:/
   <DIR>  basic
   <DIR>  bmps
   <DIR>  demos
   <DIR>  games
   <DIR>  jpegs
   <DIR>  lbcards
   <DIR>  performance
   <DIR>  wave
8 directories, 0 files
Test Sound
- Loads sample4.wav file
- Type
chdir "/wave"
play wav "sample4.wav"
- Sound should come out of speakers
- Stop with
play stop
Test Keyboard
- Type on keyboard
- Verify keys show up on VGA
Test VGA
- Type
chdir "/demos"
load "Colours.bas"
run
- Verify 16 distinct colors on VGA
- Type
mode 1
Test 5V in
- Connect USB B to 5V (or PC)
- Remove USB Micro cable
- Card should continue to run
Test I2C (Optional)
- Use DS1307 RTC attached to I2C J1
option system i2c gp14, gp15
rtc gettime
print time$
Combined Copy/Paste
- Above tests can be copy/pasted
files

chdir "/demos"
load "Colours.bas"
run
chdir "/wave"
play wav "sample4.wav"

play stop

mode 1

option system i2c gp14, gp15
rtc gettime
print time$
Enclosure
- Panel cutouts
- PiPicoMite03 Panel Cutouts pdf file
- Print and use to cut the panel holes
- 99.5mmx69.5mm outline
- Board is designed to fit into Aluminum Project Box Enclosure DIY 100*76*35mm - ebay search
- VGA, USB B (Power), 3.5mm Audio on one end
- Keyboard, SD card on the opposite end
- Enclosure cross-section
3D Printable End Panels
- 3D End Panels
- Credit to customer
Mechanicals
- Dimensions to approx. connector centers (and SD adapter slot)
- Enclosure fits 70mmx100mm card
- The PiPicoMite03 card is slightly undersized (0.5mm)
- Still fit in slots but allows for some enclosure mechanical variances
Issues
Rev 1
- Tested, working, no issues

