Difference between revisions of "I2CIO-8X"
Jump to navigation
Jump to search
Blwikiadmin (talk | contribs) |
Blwikiadmin (talk | contribs) |
||
| Line 24: | Line 24: | ||
* [https://github.com/land-boards/lb-Arduino-Code/tree/master/LBCards/I2CIO8X Github repo] - Example code | * [https://github.com/land-boards/lb-Arduino-Code/tree/master/LBCards/I2CIO8X Github repo] - Example code | ||
| − | == | + | == Factory Acceptance Test == |
| + | |||
| + | === Test Station Theory of Operations === | ||
| + | |||
| + | * Test Station controls the I2C interface on the UUT | ||
| + | * Three tests | ||
| + | ** Internal Test | ||
| + | ** External Loopback Test | ||
| + | ** Bounce an LED Test | ||
| + | |||
| + | === Test Station Set-up === | ||
| + | |||
| + | * Uses [[Arduino_Based_Test_Station|ODAS Test Station V2]] | ||
| + | * Ribbon cable sets | ||
| + | ** Loopback cable Connector | ||
| + | ** [[LED-32]] cable | ||
| + | * Unit Under Test (UUT) | ||
| + | * Attach Host Computer USB to the Arduino NANO on the Test Station | ||
| + | * Run puTTY on the Host Computer | ||
| + | ** 9600 baud | ||
| + | |||
| + | === Running Loopback Card Test === | ||
| + | |||
| + | * Use loopback cable | ||
| + | * Select Card Tests = "C" | ||
| + | * Select Run Tests = "T" | ||
| + | * Observe test results | ||
| + | |||
| + | === Running Internal Tests === | ||
| + | |||
| + | * Remove loopback cable | ||
| + | * Select Card Tests = "C" | ||
| + | * Select Run Tests = "I" | ||
| + | * Observe test results | ||
| + | |||
| + | === Running Blink LED Test === | ||
| + | |||
| + | * Attach [[LED-32]] cable | ||
| + | * Select Card Tests = "C" | ||
| + | * Select Run Tests = "B" | ||
| + | * Observe LEDs scanning in [[LED-32]] | ||
| + | |||
| + | === Reference === | ||
* [[Arduino Based Test Station]] | * [[Arduino Based Test Station]] | ||
Revision as of 20:06, 21 March 2022
Contents
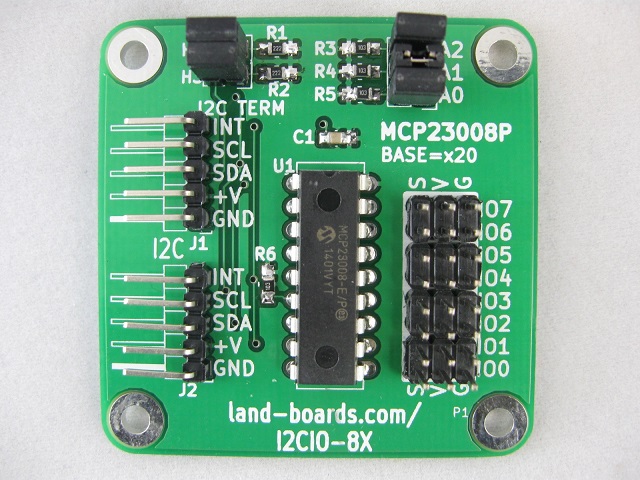
Features
- 8 bits of Digital I/O
- I2C interface
- MCP23008P
- Base address = 0x20
- Address offset jumpers (0-7)
- Interrupt pin on I2C connectors
- I2C Daisy-chain connectors
- GVS (Ground/Voltage/Signal) pins for all 8-bits
- 2.7V to 5.5V
- 49x49mm form factor
- (4) #4-40 mounting holes
Drivers/Example Code
- Github repo - Driver code
- Github repo - Example code
Factory Acceptance Test
Test Station Theory of Operations
- Test Station controls the I2C interface on the UUT
- Three tests
- Internal Test
- External Loopback Test
- Bounce an LED Test
Test Station Set-up
- Uses ODAS Test Station V2
- Ribbon cable sets
- Loopback cable Connector
- LED-32 cable
- Unit Under Test (UUT)
- Attach Host Computer USB to the Arduino NANO on the Test Station
- Run puTTY on the Host Computer
- 9600 baud
Running Loopback Card Test
- Use loopback cable
- Select Card Tests = "C"
- Select Run Tests = "T"
- Observe test results
Running Internal Tests
- Remove loopback cable
- Select Card Tests = "C"
- Select Run Tests = "I"
- Observe test results

