BeagleBone
Contents
Our Beaglebone Black Products
Our BBB Products
Add I/O to the BeagleBone Black.
- BBB-GVS - 5V GVS Beaglebone cape
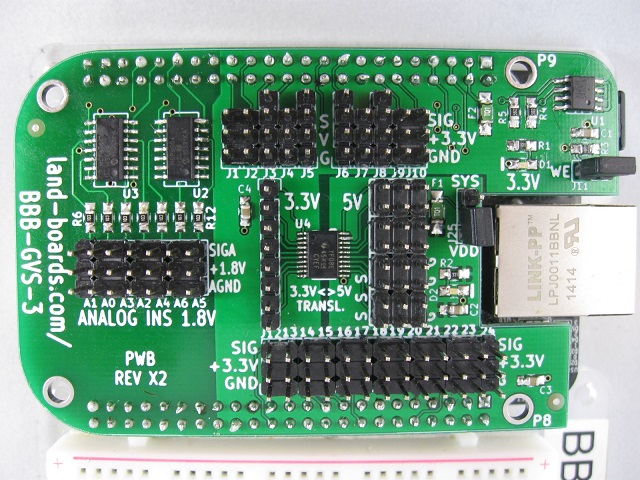
- BBB-GVS-3 - 5V GVS Beaglebone cape, Analog buffering
- BBB-COMMS-2 - 3.3V GVS Beaglebone cape with Communications and I/O
Taking the Beaglebone Black out for a walk
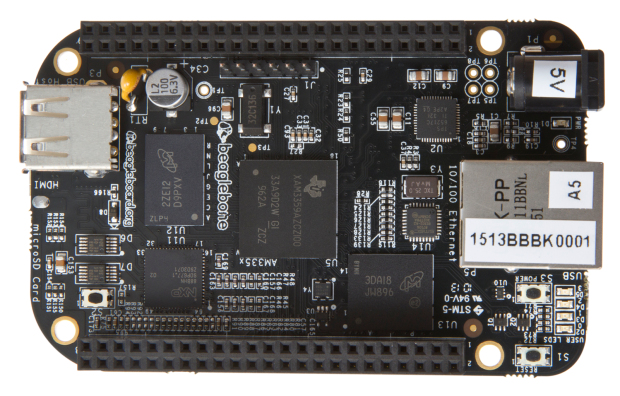
Beaglebone Black is a low-cost, open source, community-supported development platform. Boot Linux in under 10-seconds and get started on Sitara™ AM335x ARM Cortex-A8 processor development in less than 5 minutes with just a single USB cable. BeagleBone Black ships with the Ångström Linux distribution in on-board FLASH. (Excerpted from the TI website)
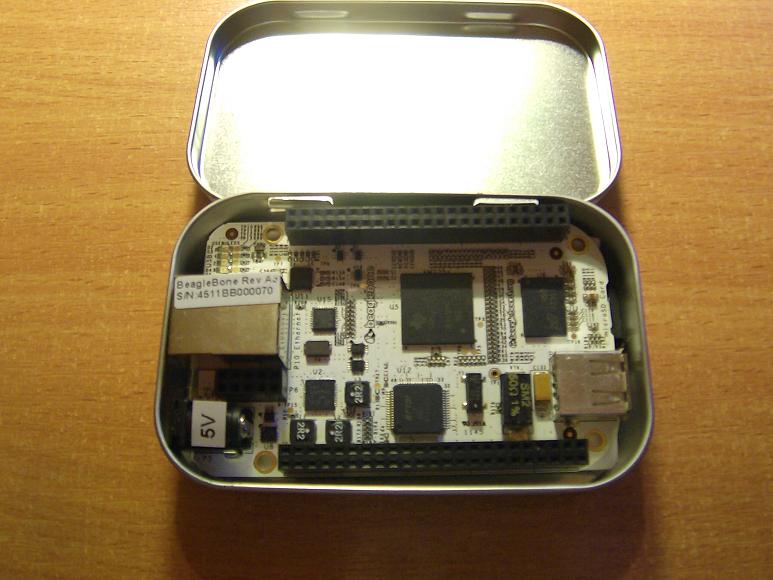
The coolest thing of all may very well be that the Beaglebone Black fits into an Altoids mint tin.
First Impressions
After working with the BeagleBone Black (BBB) for a couple of days we have some quick impressions (May 2014).
Although having 2 GB of flash memory available to hold the OS sounds great, it really doesn't take long to fill it up. The Angstrom distribution has a log file which chatters constantly due to a debug message which was turned on. Any instructions which say to do a 'dmesg' to get a driver running may not work since it may have fallen off the back of the dmesg log.
Bad Experience with Adafruit NIC
The Adafruit's Miniature WiFi (802.11b/g/n) Module: For Raspberry Pi and more was a read dud for a bunch of reasons. They are not so much BBB issues as issues with the NIC.
The Adafruit site claims "its supported by the Bone's Angstrom installation that comes with each Bone" but their tutorial page says: This tutorial may not work on Beaglebone Black or the latest versions of Angstrom (kernel 3.8+) due to changes in the OS. We're working on a new/updated tutorial, but we don't have an ETA - we'll post it as soon as we can! Thank you for your patience. This message is undated so we can't tell if it's been there a while or not. We do appreciate the warning but we bought the part based on the sales page and didn't see the warning before we bought the part. We would have bought a part that actually worked and was supported if we knew it didn't/wouldn't work. It's our pet peeve when people thank us for our patience. We are not all that patient. There are a lot of people complaining about the part on the Adafruit forums. Adafruit's tutorial instructions say to update the kernel but the sales page said that the module works with the kernel. After hours of messing around with it, we sorta got it working. But not really. We never saw it actually connect up. It may have range problems.
Here's notes (not ours) on the NIC:
I now have reliable Wifi on my BBB (A5A) with an Edimax dongle (rtl8192cu). The problem is not the driver/board (in my case), but it was apparently ages old versions of connman and wpa_supplicant. I'm using the firmware binary downloaded from debian repo and then compiled the latest connman (1.16 iirc) and latest wpa_supplicant (2.0) from sources right on the BBB itself and did a make install. Here's another listed solution:
I discovered that I had two wpa_supplicants running! I commented out the pre-up line from the /etc/network/interfaces as found on octopusprotos and now things seem to be working swell. Another:
Why not try network manager instead of connman. I was having trouble with getting the wifi (Linksys WUSB100v2) to work. Removed connman and installed network manager, installed the drivers with opkg and it worked perfect on the first try. I have had it running for about a week now besides the occasional reboot to get VNC back up and wifi is still working good. Haven't tested speed yet but it seems to be running good for
being G and considering that my phones data connection runs circles around my home data connection (best i can get in BFE unless i spend almost triple for only double the speed).
Features
(From the Beagleboard website). For an extended list of features see this site.
Processor: AM335x 1GHz ARM® Cortex-A8
- 512MB DDR3 RAM
- 2GB 8-bit eMMC on-board flash storage
- 3D graphics accelerator
- NEON floating-point accelerator
- 2x PRU 32-bit microcontrollers
Connectivity
- USB client for power & communications
- USB host
- Ethernet
- HDMI
- 2x 46 pin headers
Software Compatibility
- Ångström Linux
- Android
- Ubuntu
- Cloud9 IDE on Node.js w/ BoneScript library plus much more
I/O Connections
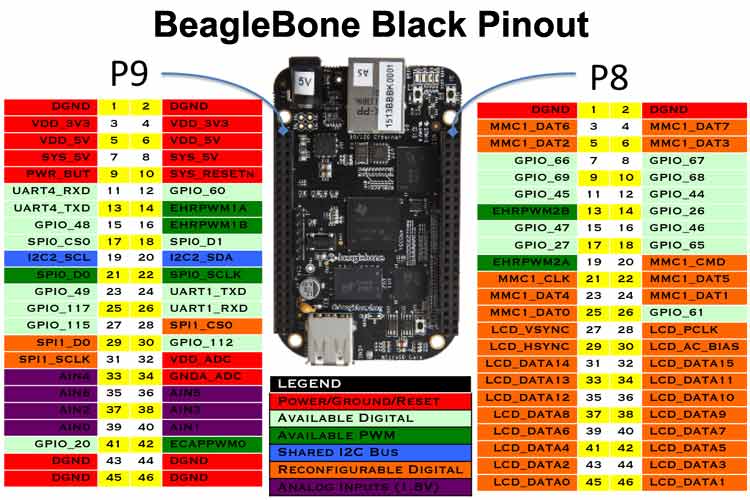
Where the Beaglebone Black really shines is I/O support.
- 3 I2C buses
- CAN bus
- SPI bus
- 4 timers
- 5 serial ports
- 65 GPIO pins
- 8 PWM outputs
- 7 analog inputs (1.8V max 12 bit A/D converters)
One-Wire on the Beaglebone
- One wire on the Beaglebone (see BB note)
PWM on the Beaglebone
VGA on the Beaglebone
I2C
- Use BeagleBone Black I2C Interface to Connect to Device - mathworks
- How to add i2c devices on the Beaglebone Black using device tree overlays? - stackoverflow
- Enable the I2C devices on the BeagleBone Black - cameon
- BeagleBone Black I2C References - datko
Enable the I2C devices on the BeagleBone Black Rev B
- On the BeagleBone Black, not all of the /dev/i2c-* devices that are enabled by default.
- The other i2c devices must be enabled before they can be used.
- To enable the I2c-1 on the BeagleBone Black Rev A, B and C:
- Rev A/B: Open the file /media/BEAGLEBONE/uEnv.txt in an editor (vim/nano)
nano /media/BEAGLEBONE/uEnv.txt
- Add the key "capemgr.enable_partno="
- Add the ports you want to enable, comma separated (BB-I2C0, BB-I2C1, etc)
- Reboot
- An example line looks like this:
root@beaglebone:/dev# cat /media/BEAGLEBONE/uEnv.txt
optargs=quiet drm.debug=7 capemgr.enable_partno=BB-I2C1
- After reboot, the device is present in the device list:
root@beaglebone:/dev# ls -l /dev/i2c*
crw-rw---- 1 root tty     249, 0 Jan  1 01:18 /dev/ttyO0
crw-rw---- 1 root dialout 249, 4 Jan  1 01:18 /dev/ttyO4
- Note: The I2C devices do not map one-to-one with the devices in /dev/.
- I.e. I2C-1 does not necessarily map to /dev/i2c-1, it could just as well be one of the other devs, e.g. /dev/i2c-2.
- Under Linux, the buses are named in the order they are enumerated which may have nothing to do with the physical names
Enable the I2C devices on the BeagleBone Black Rev C
- On the BeagleBone Black, not all of the /dev/i2c-* devices that are enabled by default.
- The other i2c devices must be enabled before they can be used.
- To enable the I2c-1 on the BeagleBone Black Rev C:
- Rev C: Open the file /boot/uboot/uEnv.txt in an editor (vim/nano)
nano /boot/uboot/uEnv.txt
- Add the key "optargs=quiet drm.debug-7 capemgr.enable_partno=BB-I2C0,BB-I2C1,BB-I2C2"
- Add the ports you want to enable, comma separated (BB-I2C0, BB-I2C1, etc)
- Reboot
- An example line looks like this:
root@beaglebone:/dev# cat /boot/uboot/uEnv.txt
optargs=quiet drm.debug-7 capemgr.enable_partno=BB-I2C0,BB-I2C1,BB-I2C2
- After reboot, the device is present in the device list:
root@beaglebone:~/BBB/MCP23008# ls -l /dev/i2c*
crw-rw---T 1 root i2c 89, 0 Apr 24 00:54 /dev/i2c-0
crw-rw---T 1 root i2c 89, 1 Apr 24 00:54 /dev/i2c-1
crw-rw---T 1 root i2c 89, 2 Apr 24 00:54 /dev/i2c-2
- Note: The I2C devices do not map one-to-one with the devices in /dev/.
- I.e. I2C-1 does not necessarily map to /dev/i2c-1, it could just as well be one of the other devs, e.g. /dev/i2c-2.
- Under Linux, the buses are named in the order they are enumerated which may have nothing to do with the physical names.
Testing the I2C devices
- You can use the standard Linux i2c tools to test your i2c setup:
- List all the enabled devices:
root@beaglebone:/dev# i2cdetect -l
i2c-0   i2c             OMAP I2C adapter                        I2C adapter
i2c-1   i2c             OMAP I2C adapter                        I2C adapter
- Scan all addresses on one device:
root@beaglebone:/dev# i2cdetect -y -r 0
WARNING! This program can confuse your I2C bus, cause data loss and worse!
I will probe file /dev/i2c-0 using read byte commands.
I will probe address range 0x03-0x77.
Continue? [Y/n] Y
     0  1  2  3  4  5  6  7  8  9  a  b  c  d  e  f
00:          -- -- -- -- -- -- -- -- -- -- -- -- --
10: -- -- -- -- -- -- -- -- -- -- -- -- -- -- -- --
20: -- -- -- -- UU -- -- -- -- -- -- -- -- -- -- --
30: -- -- -- -- UU -- -- -- -- -- -- -- -- -- -- --
40: -- -- -- -- -- -- -- -- -- -- -- -- -- -- -- --
50: UU -- -- -- -- -- -- -- -- -- -- -- -- -- -- --
60: -- -- -- -- -- -- -- -- -- -- -- -- -- -- -- --
70: UU -- -- -- -- -- -- --
- Scan the 2nd
root@beaglebone:/boot/uboot# i2cdetect -y -r 1
WARNING! This program can confuse your I2C bus, cause data loss and worse!
I will probe file /dev/i2c-1 using read byte commands.
I will probe address range 0x03-0x77.
Continue? [Y/n] y
     0  1  2  3  4  5  6  7  8  9  a  b  c  d  e  f
00:          -- -- -- -- -- -- -- -- -- -- -- -- --
10: -- -- -- -- -- -- -- -- -- -- -- -- -- -- -- --
20: -- -- -- -- -- -- -- -- -- -- -- -- -- -- -- --
30: -- -- -- -- -- -- -- -- -- -- -- -- -- -- -- --
40: -- -- -- -- -- -- -- -- -- -- -- -- -- -- -- --
50: -- -- -- -- UU UU UU UU -- -- -- -- -- -- -- --
60: -- -- -- -- -- -- -- -- -- -- -- -- -- -- -- --
70: -- -- -- -- -- -- -- --
- Write one byte to a device and an address:
i2cset -y 2 0x77 0xf4 0x34
- Read one byte from a device and an address:
i2cdump -y 2 0x77
Prototyping
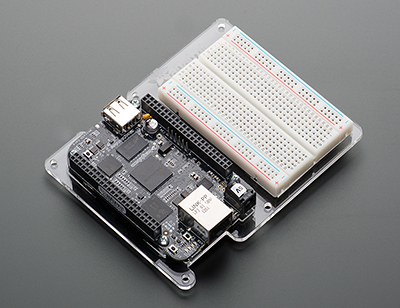
The Adafruit ProtoPlate is a great way to experiment with the I/O capabilities of the Beaglebone Black. We have used one of these for the Arduino and they are really handy for relatively small breadboard circuits.
Setting a Static IP Address on the BBB
Check Current OS Version
- The process to change the IP address depends on which version of Debian is installed
- BBB has Debian Wheezy installed
- Check OS Version
- BBB has Debian Wheezy installed
cat /etc/os-release
- Returns
PRETTY_NAME="Debian GNU/Linux 7 (wheezy)"
NAME="Debian GNU/Linux"
VERSION_ID="7"
VERSION="7 (wheezy)"
ID=debian
ANSI_COLOR="1;31"
HOME_URL="http://www.debian.org/"
SUPPORT_URL="http://www.debian.org/support/"
BUG_REPORT_URL="http://bugs.debian.org/"
- Check Current IP Address
- To get the current IP addresses
- ifconfig returns
eth0      Link encap:Ethernet  HWaddr 7c:66:9d:44:f9:cf
          inet addr:192.168.2.109  Bcast:192.168.2.255  Mask:255.255.255.0
          inet6 addr: fe80::7e66:9dff:fe44:f9cf/64 Scope:Link
          UP BROADCAST RUNNING MULTICAST  MTU:1500  Metric:1
          RX packets:401 errors:0 dropped:0 overruns:0 frame:0
          TX packets:363 errors:0 dropped:0 overruns:0 carrier:0
          collisions:0 txqueuelen:1000
          RX bytes:40945 (39.9 KiB)  TX bytes:44282 (43.2 KiB)
          Interrupt:40

lo        Link encap:Local Loopback
          inet addr:127.0.0.1  Mask:255.0.0.0
          inet6 addr: ::1/128 Scope:Host
          UP LOOPBACK RUNNING  MTU:65536  Metric:1
          RX packets:1 errors:0 dropped:0 overruns:0 frame:0
          TX packets:1 errors:0 dropped:0 overruns:0 carrier:0
          collisions:0 txqueuelen:0
          RX bytes:79 (79.0 B)  TX bytes:79 (79.0 B)

usb0      Link encap:Ethernet  HWaddr 72:1a:3f:d0:6d:2b
          inet addr:192.168.7.2  Bcast:192.168.7.3  Mask:255.255.255.252
          UP BROADCAST MULTICAST  MTU:1500  Metric:1
          RX packets:0 errors:0 dropped:0 overruns:0 frame:0
          TX packets:0 errors:0 dropped:0 overruns:0 carrier:0
          collisions:0 txqueuelen:1000
          RX bytes:0 (0.0 B)  TX bytes:0 (0.0 B)
Set New Static IP Address
Add to (or change) /etc/network/interfaces
nano /etc/network/interfaces
# The primary network interface
auto eth0 iface eth0 inet static
address 192.168.2.109
netmask 255.255.255.0
gateway 192.168.2.1
IP Addresses
- BBB are located on the Land Boards Secondary net at:
- BBB Rev C - 192.168.2.109
- BBB Rev B - 192.168.2.110
Software
- Our software is loaded into ~/pyBBB
- Software consists of
drwxr-xr-x 15 root root 4096 Jun 22  2017 .
drwx------  9 root root 4096 Jan 25 22:51 ..
drwxr-xr-x  8 root root 4096 Jan 26 04:49 .git
-rw-r--r--  1 root root  483 Jul 27  2014 .gitattributes
-rw-r--r--  1 root root 2659 Jul 27  2014 .gitignore
drwxr-xr-x  4 root root 4096 Jun 22  2017 BBB-COMMS-2
drwxr-xr-x  3 root root 4096 Jun 11  2017 BBB-GVS
drwxr-xr-x  5 root root 4096 Jul 20  2017 BBB-GVS-3
drwxr-xr-x  2 root root 4096 Jun 22  2017 BBCape_EEPROM
-rw-r--r--  1 root root   42 Jul 27  2014 README.md
drwxr-xr-x  5 root root 4096 Jul 28  2014 X3Blink
drwxr-xr-x  2 root root 4096 Jul 27  2014 analog_test
drwxr-xr-x  3 root root 4096 Jul 27  2014 authoritative_tester
drwxr-xr-x  5 root root 4096 Jul 27  2014 bbbIot
drwxr-xr-x  5 root root 4096 Jul 27  2014 blink
drwxr-xr-x  3 root root 4096 Jun 11  2017 configEEPROM
drwxr-xr-x  2 root root 4096 Jun 11  2017 mkeeprom
-rw-r--r--  1 root root  421 Jul 27  2014 setup.py
drwxr-xr-x  5 root root 4096 Jul 27  2014 switch
- This reflects our GitHub Repository
External Software Sites
- Latest images
- Debian
- Smaller BBB Debian image (500K)
- Getting started
- Writing a new Image to the Beaglebone Black
- Installing OS
External Sites
- BBB Wiki
- Enable the I2C devices on the BeagleBone Black
- BBB FAQ - A good place to start and a good general reference
- Beagleboard site
- Comparison between the Beaglebone Black and Raspberry Pi boards
- Beaglebone Black Wiki
- BeagleBone PRU Notes
- Using the Beaglebone PRU to achieve realtime at low cost
- Adafruit BBB Tutorials
- Beaglebone capes
- Fixing HDMI video
- Force BBB to boot the way you want it to boot
- To make the BBB boot from the SD card instead of the eMMC, just delete the MLO file.
