Difference between revisions of "RPI-I2C-HUB"
Jump to navigation
Jump to search
Blwikiadmin (talk | contribs) |
Blwikiadmin (talk | contribs) |
||
| (19 intermediate revisions by the same user not shown) | |||
| Line 1: | Line 1: | ||
[[File:tindie-mediums.png|link=https://www.tindie.com/products/land_boards/i2c-multiplexer-for-the-raspberry-pi-rpi-i2c-hub/]] | [[File:tindie-mediums.png|link=https://www.tindie.com/products/land_boards/i2c-multiplexer-for-the-raspberry-pi-rpi-i2c-hub/]] | ||
| − | + | [[File:I2C-RPT-01_-6026_CCA-640px.jpg]] | |
<video type="youtube">R_YUetR83N4</video> | <video type="youtube">R_YUetR83N4</video> | ||
| − | + | == I2C Hub for the Raspberry Pi == | |
| + | |||
| + | Four channel I2C Multiplexer | ||
== Features == | == Features == | ||
* I2C Hub / Repeater / Replicator / Multiplexer / De-multiplexer | * I2C Hub / Repeater / Replicator / Multiplexer / De-multiplexer | ||
| − | ** PCA9544A | + | ** [https://www.ti.com/lit/ds/symlink/pca9544a.pdf PCA9544A Datasheet] |
** Controlled via I2C | ** Controlled via I2C | ||
** Multiple part vendors | ** Multiple part vendors | ||
| Line 29: | Line 31: | ||
* PCA9544 Programming | * PCA9544 Programming | ||
| − | * Run with DigIO16-I2C card on Hub Port #0 | + | * Run with [[DigIO16-I2C]] card on Hub Port #0 |
* Verify that the Hub is seen from the Raspberry Pi | * Verify that the Hub is seen from the Raspberry Pi | ||
* Note should be -y 0 for the older revision Raspberry Pis | * Note should be -y 0 for the older revision Raspberry Pis | ||
| Line 80: | Line 82: | ||
* Card power is 3.3V | * Card power is 3.3V | ||
| + | * The [https://elinux.org/RPi_Low-level_peripherals#Power_pins Raspberry Pi has 50mA max current limits] | ||
| + | ** PCA9544 draws 11 mA (max), terminators draw 2x1mA=2mA, 2x1.5mA=3mA, total of 16mA for the card | ||
| + | ** Leaving 50-17 = 34 mA | ||
== Connectors == | == Connectors == | ||
=== J1-J4 - I2C Slave ports 0-3 === | === J1-J4 - I2C Slave ports 0-3 === | ||
| + | |||
| + | * Right angle, 0.1" pitch pins | ||
| + | * Pinout | ||
# GROUND | # GROUND | ||
| Line 89: | Line 97: | ||
# SDA | # SDA | ||
# SCK | # SCK | ||
| − | # Interrupt* | + | # Interrupt* (Active Low) |
| + | |||
| + | === P1 - Raspberry Pi Connector === | ||
| + | |||
| + | * Card has a standard Raspberry Pi 26 pin connector which works with all Raspberry Pi models | ||
| + | * Card has notch for original Pi audio jack clearance | ||
| + | |||
| + | * Pins used | ||
| + | ** 1,17 = 3.3V (50mA max) | ||
| + | ** 6,9,14,20,25 = GND | ||
| + | ** 3 = I2C SDA | ||
| + | ** 5 = I2C SCL | ||
| + | ** 11 = INT* = GPIO_17 | ||
| + | ** Other pins are unused | ||
| + | |||
| + | [[file:raspberry-pi-40-pin-gpio-layout.jpg]] | ||
== Jumpers == | == Jumpers == | ||
| Line 108: | Line 131: | ||
* The "simplest" option is to provide 3.3V power to the external I2C from the RPI-I2C-HUB card | * The "simplest" option is to provide 3.3V power to the external I2C from the RPI-I2C-HUB card | ||
** Install jumper to power the particular I2C interface from the RPI-I2C-HUB card | ** Install jumper to power the particular I2C interface from the RPI-I2C-HUB card | ||
| − | * | + | * Warning - The [https://elinux.org/RPi_Low-level_peripherals#Power_pins Raspberry Pi has 50mA max current limits] |
| + | ** PCA9544 draws 11 mA (max), terminators draw 2x1mA=2mA, 2x1.5mA=3mA, total of 16mA for the card | ||
| + | ** Leaving 50-17 = 34 mA | ||
==== External Power ==== | ==== External Power ==== | ||
| Line 117: | Line 142: | ||
** Remove Jumper to power from external interface (3.3V or 5V) | ** Remove Jumper to power from external interface (3.3V or 5V) | ||
** In this case, the terminators get pulled up from the external interface | ** In this case, the terminators get pulled up from the external interface | ||
| + | |||
| + | === I2C Termination Resistors === | ||
| + | |||
| + | * Card has 3.3K Termination resistors on SDA/SCL lines | ||
| + | |||
| + | [[file:RPI_I2C_TERMS.PNG]] | ||
== Factory Test == | == Factory Test == | ||
Latest revision as of 14:18, 2 April 2022
Contents
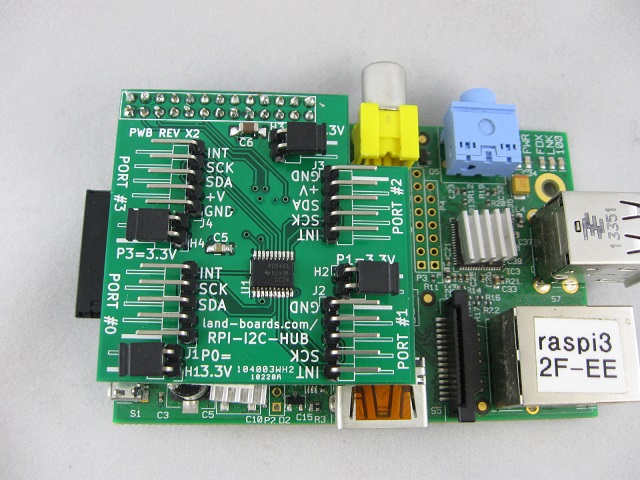
I2C Hub for the Raspberry Pi
Four channel I2C Multiplexer
Features
- I2C Hub / Repeater / Replicator / Multiplexer / De-multiplexer
- PCA9544A Datasheet
- Controlled via I2C
- Multiple part vendors
- Devices with the same address can be attached to different ports
- Host I2 port goes to Raspberry Pi I2C lines
- 3.3V host operation
- Four I2C slave ports
- I2C ports can use the Raspberry Pi or have their own power (power source select jumper)
- A Raspberry PI which runs 3.3V can control an I2C device which runs at 5V
- Voltage translation between the ports
- I2C ports can be 3.3V or 5V
- Fits in any Raspberry Pi model
- Cutout for Model B RCA video jack
- Interrupt controller on each channel and host 100KHz/400KHz operation
- On-board termination resistors
Testing
- PCA9544 Programming
- Run with DigIO16-I2C card on Hub Port #0
- Verify that the Hub is seen from the Raspberry Pi
- Note should be -y 0 for the older revision Raspberry Pis
pi@raspi3 ~ $ sudo i2cdetect -y 1
     0  1  2  3  4  5  6  7  8  9  a  b  c  d  e  f
00:          -- -- -- -- -- -- -- -- -- -- -- -- --
10: -- -- -- -- -- -- -- -- -- -- -- -- -- -- -- --
20: -- -- -- -- -- -- -- -- -- -- -- -- -- -- -- --
30: -- -- -- -- -- -- -- -- -- -- -- -- -- -- -- --
40: -- -- -- -- -- -- -- -- -- -- -- -- -- -- -- --
50: -- -- -- -- -- -- -- -- -- -- -- -- -- -- -- --
60: -- -- -- -- -- -- -- -- -- -- -- -- -- -- -- --
70: -- 71 -- -- -- -- -- --
- Shows that there is an I2C part at 0x71
- Next, set the mux to channel #0
pi@raspi3 ~ $ sudo i2cset -y 1 0x71 0x04 0x04
- Verify that the hub is set to the port
pi@raspi3 ~ $ sudo i2cdetect -y 1
     0  1  2  3  4  5  6  7  8  9  a  b  c  d  e  f
00:          -- -- -- -- -- -- -- -- -- -- -- -- --
10: -- -- -- -- -- -- -- -- -- -- -- -- -- -- -- --
20: 20 -- -- -- -- -- -- -- -- -- -- -- -- -- -- --
30: -- -- -- -- -- -- -- -- -- -- -- -- -- -- -- --
40: -- -- -- -- -- -- -- -- -- -- -- -- -- -- -- --
50: 50 -- -- -- -- -- -- -- -- -- -- -- -- -- -- --
60: -- -- -- -- -- -- -- -- -- -- -- -- -- -- -- --
70: -- 71 -- -- -- -- -- --
- This shows the two addresses of the DigIO16-I2C
- Raspberry Pi Code - Bounce a light across 8 LEDs on a MCP23017
Interrupts
- (4) Active Low Inputs
- 3.3K pullups
- Active Low Output
- 3.3K pullup
- On Raspberry Pi GPIO_17
- Each GPIO pin, when configured as a general-purpose input, can be configured as an interrupt source to the ARM.
- Test code is here
Power
- Card power is 3.3V
- The Raspberry Pi has 50mA max current limits
- PCA9544 draws 11 mA (max), terminators draw 2x1mA=2mA, 2x1.5mA=3mA, total of 16mA for the card
- Leaving 50-17 = 34 mA
Connectors
J1-J4 - I2C Slave ports 0-3
- Right angle, 0.1" pitch pins
- Pinout
- GROUND
- Power (see H1-H4 Jumpers for explanation)
- SDA
- SCK
- Interrupt* (Active Low)
P1 - Raspberry Pi Connector
- Card has a standard Raspberry Pi 26 pin connector which works with all Raspberry Pi models
- Card has notch for original Pi audio jack clearance
- Pins used
- 1,17 = 3.3V (50mA max)
- 6,9,14,20,25 = GND
- 3 = I2C SDA
- 5 = I2C SCL
- 11 = INT* = GPIO_17
- Other pins are unused
Jumpers
H1-H4 - I2C power source selection
- Installed - Raspberry Pi provides 3.3V power on the I2C connector power pin 2
- Not installed - External device provides power on the I2C connector power pin 2
Power Options
- The card has flexible power options to power external I2C interfaces
- 3.3V power to the Host Interface comes from the Raspberry Pi
- This power can be used to drive external devices on the 4 I2C slave ports
Simple Method
- The "simplest" option is to provide 3.3V power to the external I2C from the RPI-I2C-HUB card
- Install jumper to power the particular I2C interface from the RPI-I2C-HUB card
- Warning - The Raspberry Pi has 50mA max current limits
- PCA9544 draws 11 mA (max), terminators draw 2x1mA=2mA, 2x1.5mA=3mA, total of 16mA for the card
- Leaving 50-17 = 34 mA
External Power
- External interface can also have independent power
- External interfaces can be at different voltage level from the I2C-RPT-01 card
- Example #1: Raspberry Pi voltage is 3.3V and interface to 5V I2C interfaces
- Remove Jumper to power from external interface (3.3V or 5V)
- In this case, the terminators get pulled up from the external interface
- External interfaces can be at different voltage level from the I2C-RPT-01 card
I2C Termination Resistors
- Card has 3.3K Termination resistors on SDA/SCL lines
Factory Test
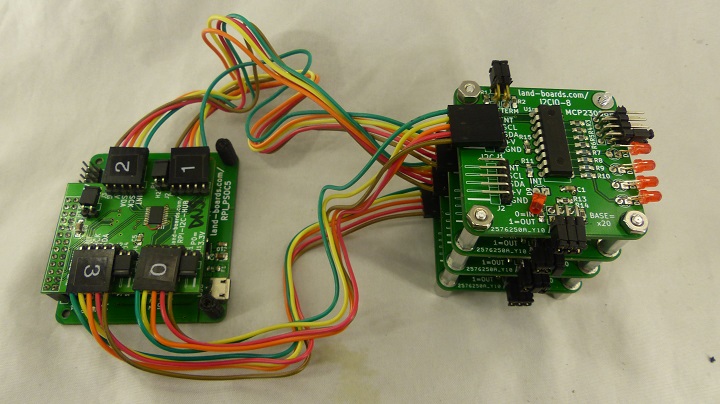
- Using RPI_PSOC5 Card
- Four I2CIO-8 cards
- Four 5 conductor I2C cables
- Running PuTTY
- 115,200 baud
- Find serial port from Device Manager
- Menu
Land Boards, LLC - RPi Card Test Station
1 - Select RPP-UIO-16 Card
2 - Select RPPSOC Card
3 - Select RASPI-PLUS-GVS-CFG Card
4 - Select RASPI-GVS Card
5 - Select RASPI-PLUS-GVS Card
6 - Select RPI-I2C-HUB Card
R - Read EEPROM
W - Write EEPROM
D - Debug card
B - Bounce LED across Card GPIOs
? - Print this menu
- Select 6 to select RPI-I2C-HUB card
- Select D to test the card access of the four I2CIO-8 cards
- Select B to bounce across LEDs
- Select T to test the Interrupt lines
- Insert/remove slowly shunts on input lines of I2CIO-8 cards
- Int light will go out momentarily and messages will be displayed
- Messages will be like
Input changed on channel 0 value = 0
Input changed on channel 0 value = 1
Input changed on channel 1 value = 0
Input changed on channel 1 value = 2
Input changed on channel 2 value = 0
Input changed on channel 2 value = 8
Input changed on channel 3 value = 0
Input changed on channel 3 value = 4
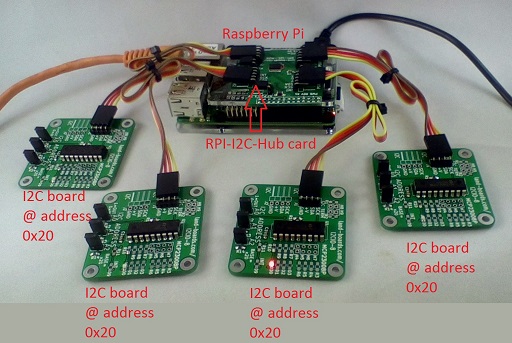
Alternate Test Setup
Test Steps
- Hook up Raspberry Pi to Ethernet
- Ethernet is using static IP
- Connect (4) I2CIO-8 cards (Rev X2 or later add Interrupt line)
- Set I2CIO-8 cards addresses to 000
- Terminator jumpers not present
- Use 5-pin 1:1 cables
- Power up the Pi (using puTTY)
- Verify all 4 I2CIO-8 cards have INT LEDs illuminated
- Log onto Pi
- Test code is here
- Enter
cd ~/RasPi/RPI-I2C-Hub/R-Hub-Intr-4x8
sudo python R-Hub-Intr-4x8.py
- Will cycle through the LEDs on all four cards
- Insert/remove slowly (every 2 secs or so) shunts on input lines of I2CIO-8 cards
- Int light will go out momentarily until message is displayed
- Messages will be like
Input changed on channel 0 value = 0
Input changed on channel 0 value = 1
Input changed on channel 1 value = 0
Input changed on channel 1 value = 2
Input changed on channel 2 value = 0
Input changed on channel 2 value = 8
Input changed on channel 3 value = 0
Input changed on channel 3 value = 4
- Verify all channels show input change (values do not matter)
Schematic
Example Code/Driver
Checkout - Rev X1
- Changed base address to 0x71
- Added some extra pins marking


