Difference between revisions of "Beaks Through Hole Peaks"
Jump to navigation
Jump to search
Blwikiadmin (talk | contribs) |
Blwikiadmin (talk | contribs) |
||
| (78 intermediate revisions by the same user not shown) | |||
| Line 1: | Line 1: | ||
| − | [[file: | + | [[file:Beaks_P1080894-720px.jpg]] |
| − | |||
| − | |||
| − | |||
| − | |||
| − | |||
== Features == | == Features == | ||
| + | * Through hole version of [https://mutable-instruments.net/modules/peaks/ Mutable Instruments Peaks module] | ||
* Acts as | * Acts as | ||
** ADSR | ** ADSR | ||
| Line 18: | Line 14: | ||
** Drum Synth | ** Drum Synth | ||
* Buttons | * Buttons | ||
| − | ** Manual | + | ** (2) Manual Triggers - lighted buttons |
* Inputs | * Inputs | ||
** (2) Trigger | ** (2) Trigger | ||
* Outputs | * Outputs | ||
| − | ** 2 | + | ** 2 PWM Outputs |
* Knobs | * Knobs | ||
** Parameters - mode dependent | ** Parameters - mode dependent | ||
| Line 30: | Line 26: | ||
*** Expert | *** Expert | ||
| − | == Notes == | + | == Credits/Resources == |
| + | |||
| + | * [https://www.tindie.com/products/Sourcery/beaks-a-throughhole-pwm-version-of-mi-peaks/ Beaks Through-hole on Kristian Blåsol's Tindie] | ||
| + | * [https://github.com/SourceryOne/Beaks/ Kristian Blåsol's GitHub] | ||
| + | ** [https://github.com/SourceryOne/Beaks/blob/main/Schematics_Beaks0.3.pdf Beaks Schematics] | ||
| + | * [https://github.com/matias-levy/peaks Mathias Levy's Github] | ||
| + | ** [https://github.com/land-boards/lb-boards/tree/master/SYNTHS/Docs/Modules/Mutable%20Instruments/MI%20Beaks%20(Peaks)/Software Backup of firmware] | ||
| + | * [https://github.com/land-boards/lb-boards/blob/master/SYNTHS/Docs/Modules/Mutable%20Instruments/MI%20Beaks%20(Peaks)/Peaks1-cheatsheet.pdf Peaks Cheatsheet] | ||
| + | |||
| + | == Original Peaks == | ||
| + | |||
| + | [[FILE:peaks_panel_front-720px.jpg]] | ||
| + | |||
| + | * [https://mutable-instruments.net/modules/peaks/ Mutable Instruments Peaks page] | ||
| + | * 8 HP | ||
| + | * 25mm depth | ||
| + | * +12V@60 mA, -12V@2mA | ||
| + | |||
| + | === Original Peaks Features === | ||
| + | |||
| + | * A SWISS-ARMY KNIFE FOR PERCUSSIVE PATCHES | ||
| + | * Peaks is a dual-channel module – making it very useful for duophonic patches or for controlling/synthesizing the kick/snare rhythmic backbone of a patch. | ||
| + | ** Peaks provides 4 different functions in a small 8-HP package: ADSR, LFO / Tap tempo LFO, and drum synth. | ||
| + | ** Their common point? | ||
| + | *** They are all about generating an audio or CV signal in response to a trigger, and are all focused on rhythmic works. | ||
| + | * Four in one… | ||
| + | * ADSR envelope generator | ||
| + | ** Segment durations ranging from 0.2ms to 8s. | ||
| + | ** Quartic attack, exponential decay, exponential release. | ||
| + | * LFO and tap-tempo LFO | ||
| + | ** 0.03 Hz to 160 Hz. | ||
| + | ** 5 basic waveforms: square, triangle, sine, stepped, random. | ||
| + | ** Waveform variations and morphing for each of these: PWM, slope, folding/harmonics, step size, interpolation. | ||
| + | ** Phase at reset control. | ||
| + | ** Tap LFO can lock onto irregular rhythms. | ||
| + | * Drum synth | ||
| + | ** Channel 1: 808 kick model with extra parameters (tune, punch). | ||
| + | ** Channel 2: 808 snare model with extra parameters (tune, decay). | ||
| + | ** Channel 2: A specific combination of settings transform the snare into a modelled 808 hi-hat. | ||
| + | * Control modes | ||
| + | ** Twin: Channel 1&2 share the same parameters but can be triggered independently. | ||
| + | ** Split: Channel 1 is edited by knobs 1&2, channel 2 edited by knobs 3&4, with a simplified 2-parameter control scheme. | ||
| + | ** Expert: Channel 1&2 are completely independent. | ||
| + | * Specifications | ||
| + | ** Inputs: 100k impedance, threshold at 0.6V. | ||
| + | ** 16-bit CV/audio generation with 48kHz sample rate. | ||
| + | ** Output level: 0 to +8V for envelopes, 10Vpp for LFOs and drum signals. | ||
| + | |||
| + | == STM32 "Blue Pill" == | ||
| + | |||
| + | * [[STM32 Blue Pill]] | ||
| + | * "Blue Pill" Pins | ||
| + | |||
| + | [[file:STM32F103C8T6-Blue-Pill-Pin-Layout-720px.png]] | ||
| + | |||
| + | * "Blue Pill" Schematic | ||
| + | |||
| + | [[file:BluePillSchematic-720px.png]] | ||
| + | |||
| + | == Videos == | ||
| + | |||
| + | <video type="youtube">ghp1fHEp78A</video> | ||
| + | |||
| + | <video type="youtube">qR82LP9MuM0</video> | ||
| + | |||
| + | <video type="youtube">4Dw9ukSKVNc</video> | ||
| + | |||
| + | <video type="youtube">9orFW9q-nqo</video> | ||
| + | |||
| + | <video type="youtube">UTsxIKvHSWQ</video> | ||
| + | |||
| + | <video type="youtube">HC0q_cgUTvg</video> | ||
| + | |||
| + | == Build PCB Pictures == | ||
| + | |||
| + | [[file:Beaks_Card_Set_720px.jpg]] | ||
| + | |||
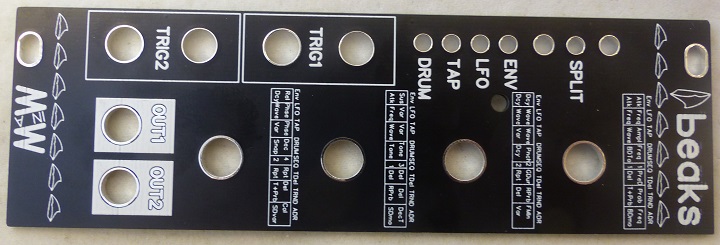
| + | * Front Panel - Front view | ||
| + | |||
| + | [[FILE:MI_Beaks_Front_Panel_Front_P1080709-720px.jpg]] | ||
| + | |||
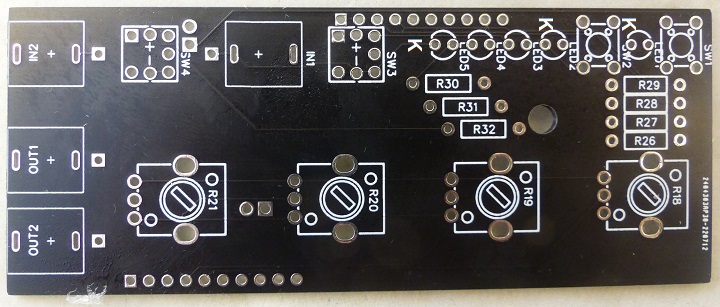
| + | * Controls Card - Front view | ||
| + | |||
| + | [[FILE:MI_Beaks_Switches_P1080714-720px.jpg]] | ||
| + | |||
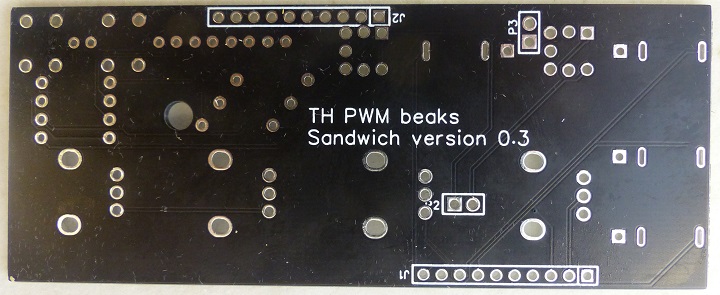
| + | * Controls Card - Rear view | ||
| + | |||
| + | [[FILE:MI_Beaks_Controls_Rear_Side_P1080715-720px.jpg]] | ||
| + | |||
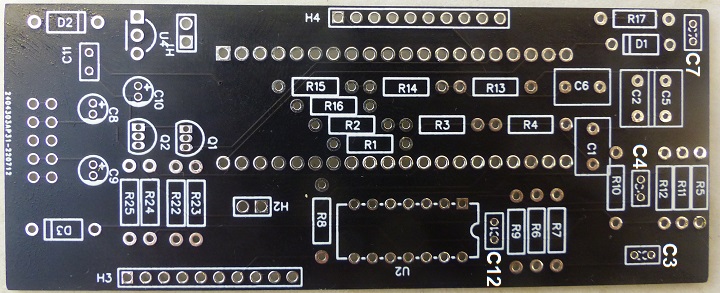
| + | * Processing Card - Front view | ||
| + | |||
| + | [[FILE:MI_Beaks_P1080712_Analog_Comp_Side-720px.jpg]] | ||
| + | |||
| + | * Processing Card - Rear view | ||
| + | |||
| + | [[FILE:MI_Beaks_P1080712_Analog_Rear_Side_P1080713-720px.jpg]] | ||
| + | |||
| + | == Build Notes == | ||
* [https://www.tindie.com/products/Sourcery/beaks-a-throughhole-pwm-version-of-mi-peaks/ Get the PCB set with panel and both PCBs for 9$ at Kristian's Tindie store] | * [https://www.tindie.com/products/Sourcery/beaks-a-throughhole-pwm-version-of-mi-peaks/ Get the PCB set with panel and both PCBs for 9$ at Kristian's Tindie store] | ||
** [https://www.tindie.com/stores/Sourcery/ Tindie store] | ** [https://www.tindie.com/stores/Sourcery/ Tindie store] | ||
** (Or) Download the [https://sound-force.nl/?page_id=3179 Gerber files] - sound-force page | ** (Or) Download the [https://sound-force.nl/?page_id=3179 Gerber files] - sound-force page | ||
| − | |||
| − | |||
| − | |||
| − | |||
* [https://github.com/MyModularJourney/Braids Front panel gerber by MyModularJourney] | * [https://github.com/MyModularJourney/Braids Front panel gerber by MyModularJourney] | ||
* [http://www.vo1t.com/Euro//BraidsIllustrated1.8.pdf Braids illustrated. all the waveforms explained] | * [http://www.vo1t.com/Euro//BraidsIllustrated1.8.pdf Braids illustrated. all the waveforms explained] | ||
| Line 47: | Line 136: | ||
* [https://discord.gg/pZtVheVCTW Kristian's Discord server] - See mt-th-braids channel | * [https://discord.gg/pZtVheVCTW Kristian's Discord server] - See mt-th-braids channel | ||
| − | == Parts List Notes == | + | === Parts List Notes === |
| − | * Parts List has JLCPCB part numbers | + | * Parts List has [https://jlcpcb.com/parts JLCPCB part numbers] |
* SW1, SW2 - [https://jlcpcb.com/partdetail/Usakro-UK_B0202_G14160/C620311 JLCPCB C620311] - Tactile Switch, 6mm, 14mm | * SW1, SW2 - [https://jlcpcb.com/partdetail/Usakro-UK_B0202_G14160/C620311 JLCPCB C620311] - Tactile Switch, 6mm, 14mm | ||
| + | ** [https://www.ebay.com/itm/223492387652?var=522247396254 Ordered on Ebay] | ||
* SW3, SW4 - [https://jlcpcb.com/partdetail/Diptronics-ML6H2T2RQA/C501573 JLCPCB C501573] - Illuminated switch (ordered along with PCB] | * SW3, SW4 - [https://jlcpcb.com/partdetail/Diptronics-ML6H2T2RQA/C501573 JLCPCB C501573] - Illuminated switch (ordered along with PCB] | ||
* LEDs have Green body when off, but light up in yellow when illuminated | * LEDs have Green body when off, but light up in yellow when illuminated | ||
| + | * Can use 100K pots? | ||
| + | ** The pots are used to set levels into the STM32 analog pins | ||
| + | * [https://www.aliexpress.us/item/2251801139870562.html?aff_fcid=3b9fa86eb0554ff29ba0a6b77c812cbd-1668328660760-01745-_DFPvQEB&tt=CPS_NORMAL&aff_fsk=_DFPvQEB&aff_platform=shareComponent-detail&sk=_DFPvQEB&aff_trace_key=3b9fa86eb0554ff29ba0a6b77c812cbd-1668328660760-01745-_DFPvQEB&terminal_id=27d42930204b4f3ca90005888e7c8cd4&afSmartRedirect=y&gatewayAdapt=glo2usa4itemAdapt&_randl_shipto=US 5pcs Red Common Cathode 7 segment display] - '''MAKE SURE TO CHOOSE COMMON CATHODE''' | ||
| + | * [https://www.aliexpress.us/item/3256801435312142.html?aff_fcid=19e3c157d442455d96274e2a86d0207e-1668328775090-01714-_Ddyuri3&tt=CPS_NORMAL&aff_fsk=_Ddyuri3&aff_platform=shareComponent-detail&sk=_Ddyuri3&aff_trace_key=19e3c157d442455d96274e2a86d0207e-1668328775090-01714-_Ddyuri3&terminal_id=27d42930204b4f3ca90005888e7c8cd4&afSmartRedirect=y&gatewayAdapt=glo2usa4itemAdapt&_randl_shipto=US Get a STM32 Programmer here] | ||
| + | ** The STM32F103C8T6 is the 64kb version and thus too small but SOMETIMES they are 128kb | ||
| + | * STM32F013CBT8 (128kb version) on ebay... not that many to choose from :/ | ||
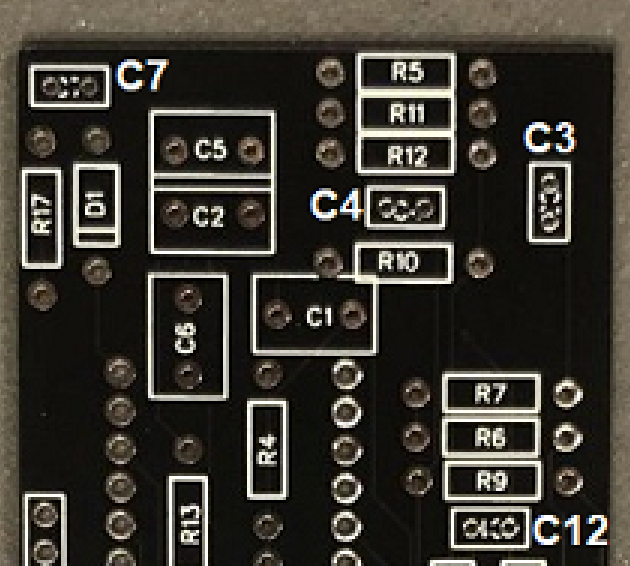
* Added cap ref des C3, C4, C7, C12 | * Added cap ref des C3, C4, C7, C12 | ||
| + | * Connectors are "Thonny" PJ398SM style connectors, aka [http://www.qingpu-electronics.com/en/products/WQP-PJ398SM-362.html WQP-WQP518MA] | ||
[[file:Beaks_Added_Cap_Ref_Des.PNG]] | [[file:Beaks_Added_Cap_Ref_Des.PNG]] | ||
| Line 61: | Line 158: | ||
[[file:Beaks_LEDs_Down.PNG]] | [[file:Beaks_LEDs_Down.PNG]] | ||
| − | == | + | == Build Pictures == |
| + | |||
| + | * Controls card with resistors | ||
| + | |||
| + | [[file:MI_Beaks_Controls_Resistors-Added_P1080720-720px.jpg]] | ||
| + | |||
| + | * Analog Front side card with resistors, transistors, and caps | ||
| + | |||
| + | [[file:MI_Beaks_Analog_Card_Front_Side_Resistors_Caps_P1080746-720px.jpg]] | ||
| + | |||
| + | * Analog Rear side card with resistors | ||
| + | |||
| + | [[file:MI_Beaks_Analog_Card_Rear_Side_Resistors_Caps_P1080743-720px.jpg]] | ||
| + | |||
| + | * 12.5mm Shaft pots and Jacks on controls card mounted to Front Panel | ||
| + | ** PL calls for 15mm pots | ||
| − | [[file: | + | [[file:MI_Beaks_Front_Panel_With_Ctrls_Jacks_P1080734-720px.jpg]] |
| − | == | + | [[File:Beaks_P1080903-720px.jpg]] |
| + | |||
| + | * STM32 installed | ||
| + | |||
| + | [[file:Beaks_P1080906-720PX.jpg]] | ||
| + | |||
| + | == Checkout == | ||
| − | + | * Forgot to install U2 opamp | |
| + | * Missed solder on OUT 1 connector tip | ||
| + | * Found short at Q2 from base to ground preventing TRIG2 from working | ||
| − | + | === Testing === | |
| − | + | * OUT 1 and OUT 2 to [[ER-MIXER5-01]] inputs | |
| + | * Set mode to Drums by pressing top button (above SPLIT) silkscreen | ||
| + | ** Mode LEDs should cycle between modes | ||
| + | * Press SPLIT pushbutton (below SPLIT silkscreen/LED) | ||
| + | ** SPLIT LED should light | ||
| + | * Press TRIG 1 lighted pushbutton, lights when pressed and drum sound is heard | ||
| + | * Press TRIG 2 lighted pushbutton, lights when pressed and drum sound is heard | ||
| + | * Insert GATE signal into TRIG 1 jack | ||
| + | ** Should make Foot Drum sound | ||
| + | * Insert GATE signal into TRIG 3 jack | ||
| + | ** Should make Snare Drum sound | ||
| + | * All working | ||
| − | + | == Software == | |
| − | + | * [https://github.com/matias-levy/peaks Mathias Levy's Github] | |
| + | ** [https://github.com/land-boards/lb-boards/tree/master/SYNTHS/Docs/Modules/Mutable%20Instruments/MI%20Beaks%20(Peaks)/Software Backup of firmware] | ||
| + | * Tried beaks2 also | ||
| + | ** More complicated user interface | ||
| − | + | === Uploading Code to Blue Pill === | |
| − | == | + | * [https://www.ebay.com/sch/i.html?_from=R40&_trksid=p2380057.m570.l1313&_nkw=ST+Link+V2&_sacat=0 ST Link V2] |
| + | * Before programming, set jumpers on Blue Pill module set towards center of card | ||
| + | * Use STMCubeProgrammer software to program card | ||
| − | [[ | + | [[File:BluePill_Jumper.png]] |
| − | + | * After programming, set jumpers on Blue Pill module set towards USB jack | |
Latest revision as of 15:30, 20 January 2023
Contents
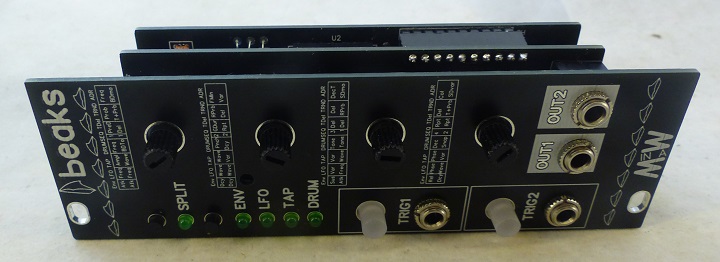
Features
- Through hole version of Mutable Instruments Peaks module
- Acts as
- ADSR
- LFO
- Tap LFO
- Drum
- 4 step Sequencer
- Trigger Delay
- Trigger Randomizer
- Drum Synth
- Buttons
- (2) Manual Triggers - lighted buttons
- Inputs
- (2) Trigger
- Outputs
- 2 PWM Outputs
- Knobs
- Parameters - mode dependent
- Mode controls knob function
- Split (2 knobs each)
- Twin
- Expert
Credits/Resources
- Beaks Through-hole on Kristian Blåsol's Tindie
- Kristian Blåsol's GitHub
- Mathias Levy's Github
- Peaks Cheatsheet
Original Peaks
- Mutable Instruments Peaks page
- 8 HP
- 25mm depth
- +12V@60 mA, -12V@2mA
Original Peaks Features
- A SWISS-ARMY KNIFE FOR PERCUSSIVE PATCHES
- Peaks is a dual-channel module – making it very useful for duophonic patches or for controlling/synthesizing the kick/snare rhythmic backbone of a patch.
- Peaks provides 4 different functions in a small 8-HP package: ADSR, LFO / Tap tempo LFO, and drum synth.
- Their common point?
- They are all about generating an audio or CV signal in response to a trigger, and are all focused on rhythmic works.
- Four in one…
- ADSR envelope generator
- Segment durations ranging from 0.2ms to 8s.
- Quartic attack, exponential decay, exponential release.
- LFO and tap-tempo LFO
- 0.03 Hz to 160 Hz.
- 5 basic waveforms: square, triangle, sine, stepped, random.
- Waveform variations and morphing for each of these: PWM, slope, folding/harmonics, step size, interpolation.
- Phase at reset control.
- Tap LFO can lock onto irregular rhythms.
- Drum synth
- Channel 1: 808 kick model with extra parameters (tune, punch).
- Channel 2: 808 snare model with extra parameters (tune, decay).
- Channel 2: A specific combination of settings transform the snare into a modelled 808 hi-hat.
- Control modes
- Twin: Channel 1&2 share the same parameters but can be triggered independently.
- Split: Channel 1 is edited by knobs 1&2, channel 2 edited by knobs 3&4, with a simplified 2-parameter control scheme.
- Expert: Channel 1&2 are completely independent.
- Specifications
- Inputs: 100k impedance, threshold at 0.6V.
- 16-bit CV/audio generation with 48kHz sample rate.
- Output level: 0 to +8V for envelopes, 10Vpp for LFOs and drum signals.
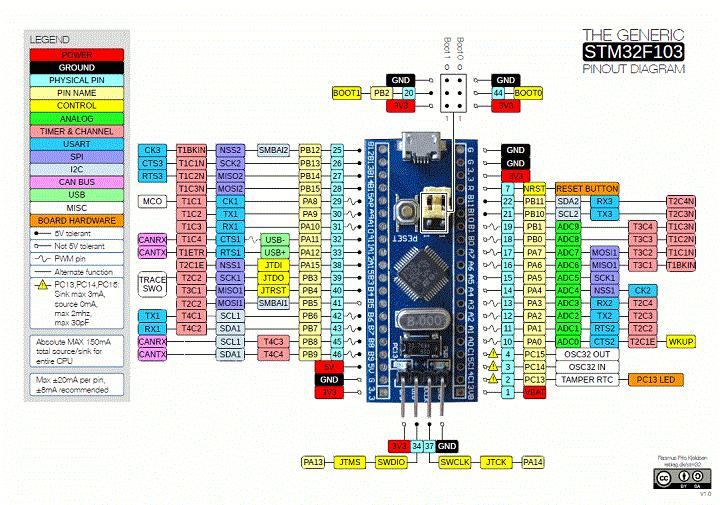
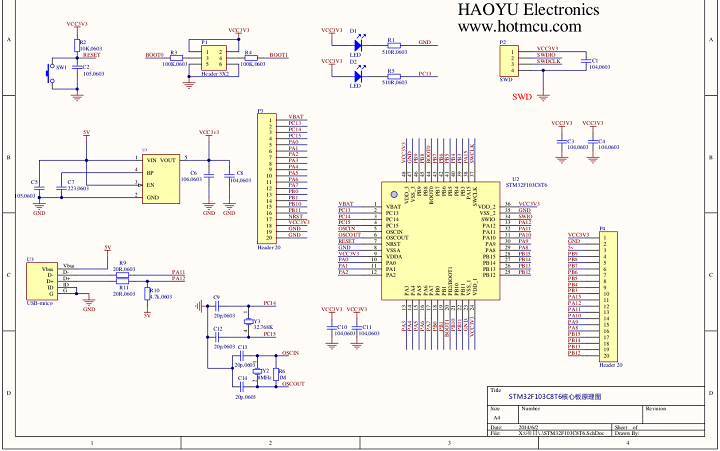
STM32 "Blue Pill"
- STM32 Blue Pill
- "Blue Pill" Pins
- "Blue Pill" Schematic
Videos
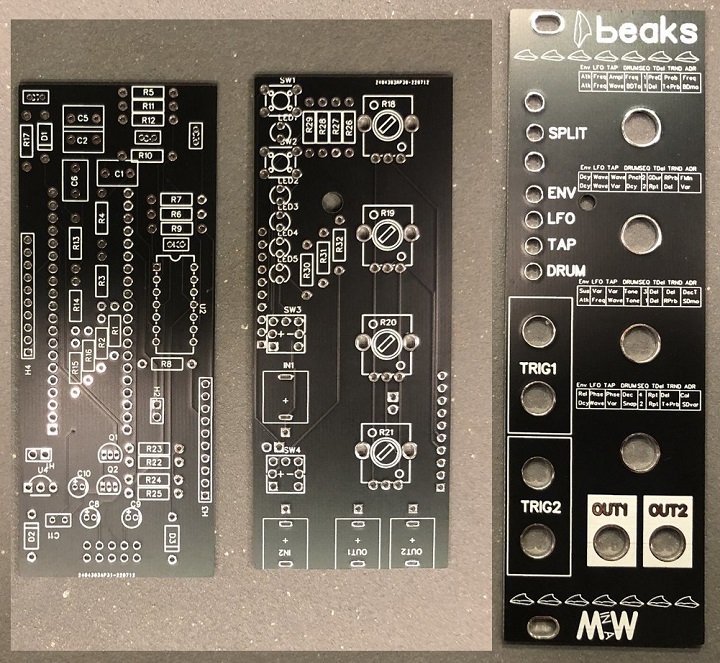
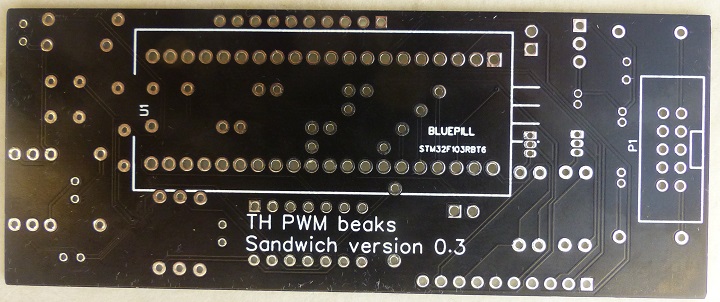
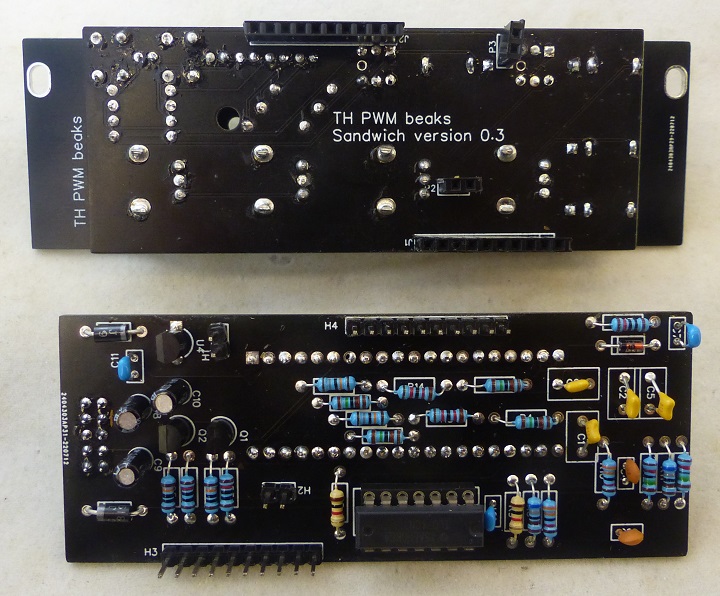
Build PCB Pictures
- Front Panel - Front view
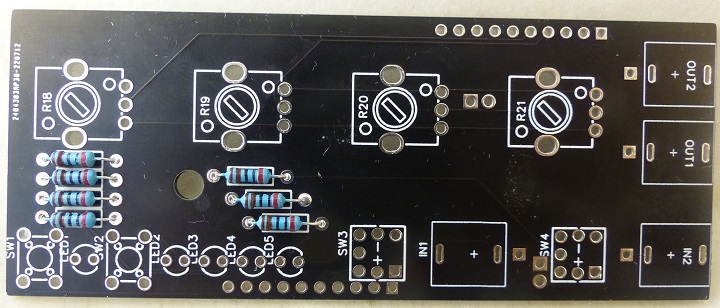
- Controls Card - Front view
- Controls Card - Rear view
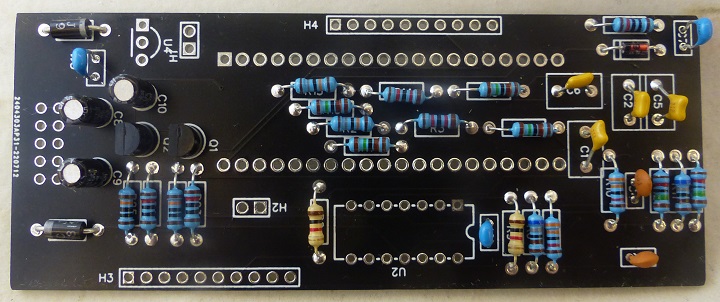
- Processing Card - Front view
- Processing Card - Rear view
Build Notes
- Get the PCB set with panel and both PCBs for 9$ at Kristian's Tindie store
- Tindie store
- (Or) Download the Gerber files - sound-force page
- Front panel gerber by MyModularJourney
- Braids illustrated. all the waveforms explained
- Discord where you find the mi-th-braids channel and much more
- Gilet / Mutable Instruments Github for all her modules - SMT version
- Modular in a Week playlist
- Support Kristian's work on Patreon
- Kristian's Discord server - See mt-th-braids channel
Parts List Notes
- Parts List has JLCPCB part numbers
- SW1, SW2 - JLCPCB C620311 - Tactile Switch, 6mm, 14mm
- SW3, SW4 - JLCPCB C501573 - Illuminated switch (ordered along with PCB]
- LEDs have Green body when off, but light up in yellow when illuminated
- Can use 100K pots?
- The pots are used to set levels into the STM32 analog pins
- 5pcs Red Common Cathode 7 segment display - MAKE SURE TO CHOOSE COMMON CATHODE
- Get a STM32 Programmer here
- The STM32F103C8T6 is the 64kb version and thus too small but SOMETIMES they are 128kb
- STM32F013CBT8 (128kb version) on ebay... not that many to choose from :/
- Added cap ref des C3, C4, C7, C12
- Connectors are "Thonny" PJ398SM style connectors, aka WQP-WQP518MA
- LEDs go Kathode down
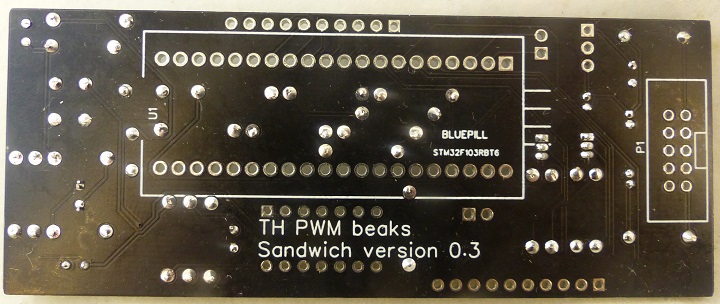
Build Pictures
- Controls card with resistors
- Analog Front side card with resistors, transistors, and caps
- Analog Rear side card with resistors
- 12.5mm Shaft pots and Jacks on controls card mounted to Front Panel
- PL calls for 15mm pots
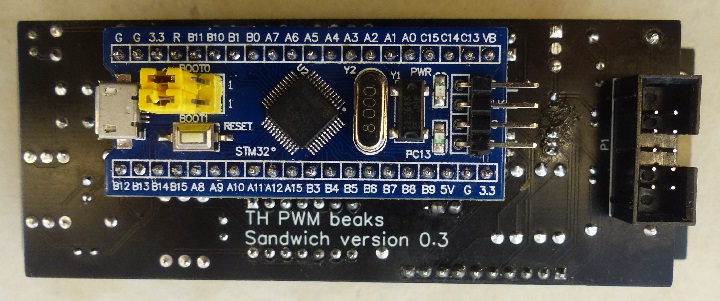
- STM32 installed
Checkout
- Forgot to install U2 opamp
- Missed solder on OUT 1 connector tip
- Found short at Q2 from base to ground preventing TRIG2 from working
Testing
- OUT 1 and OUT 2 to ER-MIXER5-01 inputs
- Set mode to Drums by pressing top button (above SPLIT) silkscreen
- Mode LEDs should cycle between modes
- Press SPLIT pushbutton (below SPLIT silkscreen/LED)
- SPLIT LED should light
- Press TRIG 1 lighted pushbutton, lights when pressed and drum sound is heard
- Press TRIG 2 lighted pushbutton, lights when pressed and drum sound is heard
- Insert GATE signal into TRIG 1 jack
- Should make Foot Drum sound
- Insert GATE signal into TRIG 3 jack
- Should make Snare Drum sound
- All working
Software
- Mathias Levy's Github
- Tried beaks2 also
- More complicated user interface
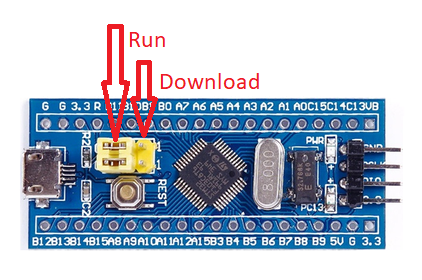
Uploading Code to Blue Pill
- ST Link V2
- Before programming, set jumpers on Blue Pill module set towards center of card
- Use STMCubeProgrammer software to program card
- After programming, set jumpers on Blue Pill module set towards USB jack
