RaspberryPi
Contents
- 1 Raspberry Pi Page
- 2 Hardware Interfaces
- 3 Raspberry Pi Cluster Home Page
- 4 Pi Mechanicals
- 5 Using a Raspberry Pi as Wireless to Ethernet Switch Bridge
- 6 Setting a Static IP on the Raspberry Pi (Raspian Stretch)
- 7 Setting a Static IP on the Raspberry Pi (Raspian Jessie and earlier)
- 8 Network Static IP Addresses
- 9 Other Pi/Linux Stuff
- 10 Game Machines
Raspberry Pi Page
Raspberry Pi Cards
| Documentation | Function | 3.3V GPIO | 5V GPIO | Compatible with |
|---|---|---|---|---|
| RasPi-GVS | GVS card | 0 | 16 | All Raspberry Pi Models |
| RPP-UIO-16 | GVS card 3.3V/5V | 26 | 0-16 | Raspberry Pi Models A+, B+, Pi 2 |
| RASPI-PLUS-GVS | GVS card 5V | 9 | 16 | Raspberry Pi Models A+, B+, Pi 2 |
| RASPI-PLUS-GVS-CFG | Configurable GVS hat | 26 | 0-8 | Raspberry Pi Models A+, B+, Pi 2 |
| RPIO-TINY | GVS card | 17 | 0 | All Raspberry Pi Models |
| RPIO-TINY-2 | GVS card | 17 | 0-8 | All Raspberry Pi Models |
| RPIO-TINY-3 | GVS card | 17 | 0 | All Raspberry Pi Models |
| RPI-MDI | Servo card | 3 | 0 | All Raspberry Pi Models |
| RPI-CONSOLE | Console extender card (Mini USB) | N/A | N/A | All Raspberry Pi Models |
| RPI-CONSOLE-U | Console extender card (Micro USB) | N/A | N/A | All Raspberry Pi Models |
| RPI-I2C-HUB | I2C Hub/repeater/level translator card | N/A | N/A | All Raspberry Pi Models |
| RPPSOC | Programmable System On a Chip | N/A | N/A | Raspberry Pi Models A+, B+, Pi 2, Pi 3 |
| RPI-PWR | Raspberry Pi Recessed Power Card | N/A | N/A | All Raspberry Pi Models |
| PIATX | Raspberry Pi <> ATX Case Connections | N/A | N/A | All Raspberry Pi Models |
| PC-Case-USB | ATX Case USB Connections | N/A | N/A | All Raspberry Pi Models |
| RPI_PSOC5 | Raspberry Pi "Clone" | N/A | N/A | All Raspberry Pi Models |
Prototyping plate
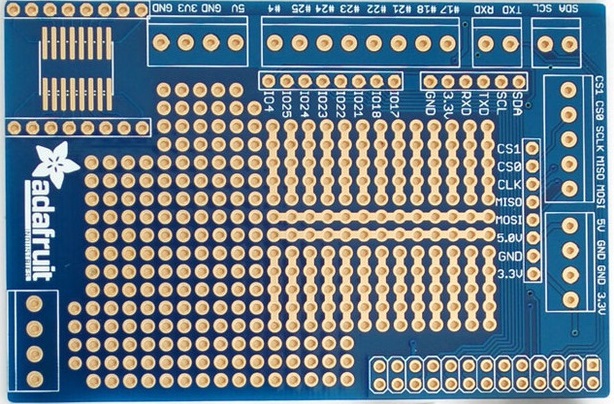
The Adafruit prototyping "plate" (ie, daughtercard) is available here.
If you put a mini-breadboard in the middle it obscures the silkscreen markings for the port numbers so the above picture can help determine which header pin corresponds to which channel.
Hardware Interfaces
The Raspberry Pi has a 26-pin BERG stick style header which has the interfaces to connect up external hardware. They provide 8 GPIO pins plus access to I2C, SPI, UART), as well as +3.3 V, +5 V and GND supply lines.
WARNING: GPIO voltage levels are 3.3 V and are not 5 V tolerant. There is no over-voltage protection on the board.
GPIO Pins
- http://makezine.com/projects/tutorial-raspberry-pi-gpio-pins-and-python/ Raspberry Pi GPIO Pins and Python
- [ http://elinux.org/RPi_Low-level_peripherals RPi Low-level peripherals at eLinux - Good description of the Raspberry Pi interfaces]
I2C Interface
- PCA9517 Hackaday i2c level translator - NRND
- PCA9306(ACTIVE) Dual Bi-Directional I2C-Bus and SMBus Voltage Level-Translator
- 4-channel Adafruit I2C-safe Bi-directional Logic Level Converter
SPI Interface
One Wire Interface
- Getting One Wire working on the Raspberry Pi
- Guidelines for Reliable Long Line 1-Wire Networks
- 1-Wire Temperature Sensors
- The Complete Channel One Temperature Monitor and Alarm Project - The Ultimate Raspberry Pi Bundle
- Raspberry Pi DS18B20 Temperature Sensing
I/O Connector
http://makezineblog.files.wordpress.com/2014/02/gpio-descriptions.png
Composite Video
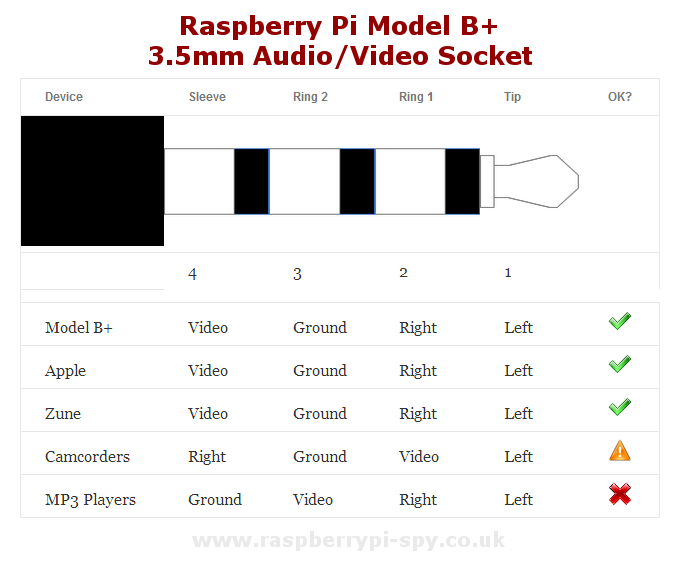
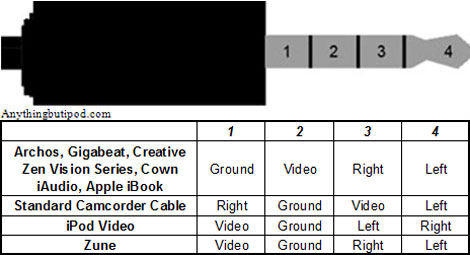
4-Pole A/V Connector
- The Raspberry Pi Models A+ and B+ have a 4-pole 3.5mm connector which has right/left audio and video
- Cheap ebay connector didn't work because of pinout
- Cable has outer ring as ground
- Raspberry Pi has outer ring as video
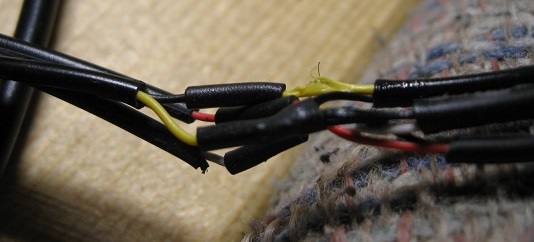
- Re-wired cable and it worked
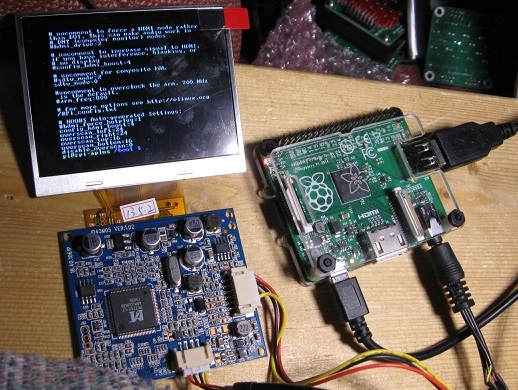
3.5" Composite Output Monitor
3.5" LCD Display with Composite Video - Was $25 from mcmelectronics (now Newark no longer sold) Specifications: Display ratio: 4:3 Backlight: LED Brightness: 300 cd/m2 Resolution: 320 x 240 Viewing Angle: 40/60 60/60 (U/D/L/R) Inputs: Composite Video Controls: Keypad control board Driving board dimension 62.0x55.2x 9.0mm 12~15VDC110mA±20mA 83-15136.jpg
Software Setup Composite Output
Using a Mini PAL/NTSC Display with a Raspberry Pi To configure Raspian for composite output Reboot the Raspberry Pi and enter your username and password. To edit the configuration file, enter the command sudo nano /boot/config.txt Add sdtv_mode=0 Normal NTSC Comment out in 2 places
- hdmi_force_hotplug=1
Uncomment and add a/r framebuffer_width=320 framebuffer_height=240
Raspberry Pi Cluster Home Page
Pi Mechanicals
The Raspberry Pi PCB measures 85mm x 56.2mm excluding overhanging connectors and is 20.8mm high. Pi Mechanicals are complicated due to a lack of adequate mounting holes. Various methods have been developed to deal with this deficiency. The primary method is clamping the card from the sides.
- Model B CAD & Mounting Info - Includes a DXF format file
- Raspberry Pi VESA Mount Case How to - A good mounting solution if you don't have a daughtercard
Using a Raspberry Pi as Wireless to Ethernet Switch Bridge
Raspberry_Pi_as_Wireless_to_Wired_Ethernet_Bridge
Setting a Static IP on the Raspberry Pi (Raspian Stretch)
- This is for Raspian Stretch and newer (as of 2019-01)
- See here for configuring the IP address for older versions of Raspian (Jessie)
To find out which version of Raspian is running
cat /etc/os-release
- From Configuring a Static IP for a Raspberry Pi running Raspbian - (Retrieved 2019-01-19).
- Open the config file for editing.
sudo nano /etc/dhcpcd.conf
At the bottom of the file add settings:
interface eth0
static ip_address=192.168.2.31/24
static routers=192.168.2.1
static domain_name_servers=192.168.2.1 8.8.8.8 4.2.2.1
static domain_search=example.com
static domain_name=example.com
Setting a Static IP on the Raspberry Pi (Raspian Jessie and earlier)
- This is for the older Raspian Jessie and earlier versions of Raspian
- See this for setting the IP on Raspian Stretch
- To find out which version of Raspian is running
cat /etc/os-release
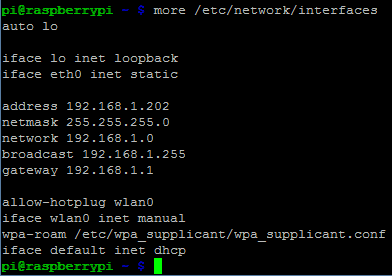
sudo nano /etc/network/interfaces

address 192.168.1.81
netmask 255.255.255.0
network 192.168.1.0
broadcast 192.168.1.255
gateway 192.168.1.1

sudo rm /var/lib/dhcp/*
Network Static IP Addresses
There are two networks. The .1 network connects to the router to the Internet. The .2 network connects to the PiRouter.
Main .1 Network Static IP Addresses
192.168.1.7 = PiRouter wireless side (as seen from the main .1 network) 192.168.1.XXX - MotionEyes camera PiCluster Addresses Intend to move the below addresses to the .2 secondary network
Secondary .2 Network Static IP Addresses
192.168.2.1 = PiRouter wired Ethernet side (as seen from the .2 network)
192.168.2.51 = hpg7i3 - HP laptop
192.168.2.101 = RPP2-02
192.168.2.102 = RP2-01
192.168.2.103 = rpp01
192.168.2.104 = rp256
192.168.2.105 = B256
192.168.2.109 = BBB_RevC
192.168.2.110 = BBB_RevB
rpp3-01 = 192.168.2.151
rpp3-02 = 192.168.2.152
rpp3-03 = 192.168.2.153
rpp3-04 = 192.168.2.154
rpp3-05 = 192.168.2.155
rpp3-06 = 192.168.2.156
rpp3-07 = 192.168.2.157
rpp3-08 = 192.168.2.158
rpp3-09 = 192.168.2.159
rpp3-10 = 192.168.2.160
rpp3-11 = 192.168.2.161
rpp3-12 = 192.168.2.162
rpp3-13 = 192.168.2.163
rpp3-14 = 192.168.2.164
rpp3-15 = 192.168.2.165
rpp3-16 = 192.168.2.166
Other Pi/Linux Stuff
- Raspberry Pi Documentation page
- GitHub for Raspberry Pi Documentation page - can copy to local git repo
- Shell programming with bash: by example, by counter-example
- How to Use the Command Line for Apple macOS and Linux
Game Machines
- RetroPie - The one we use
- PiPlay, formerly called PiMAME
- EmulationStation
- MAME4ALL for Pi by Squid
- GroovyGameGear.com

